Home security is an increasing concern for many homeowners around the globe, and security cameras like the ones from Wyze are a popular choice for many. The greatest advantage of these cameras is their ability to connect to your devices, providing you real-time updates and access to the visual feed. However, many people often wonder about the right way to set up and connect their Wyze cameras.
This comprehensive guide is designed to help new Wyze camera users empower their home security setup by learning to correctly connect and interface the camera. You will be introduced to a simplified, yet detailed guide on how you can seamlessly connect your new camera to your devices and start reaping the benefits right away.
Thanks to their user-friendly design, Wyze cameras are not complicated to connect or set up. But there are certain steps you need to follow to ensure optimal functioning. Whether you’re a tech-savvy individual looking to add another security layer to your smart home network or a novice user trying to increase your home security, you will find this step-by-step guide helpful.
We will cover the basics and guide you through the process in a straightforward manner – making it easy for you to connect your Wyze camera as quickly and efficiently as possible. So let’s dive into this essential tutorial and get the valuable insight needed to connect and fully take control of your Wyze camera.
Getting Familiar with Wyze Camera’s Key Features
The Wyze Camera is a high-quality smart home device with multiple features that make it ideal for home security. It enables you to monitor your home or business on the go and get real-time updates. Understanding these features is key to getting the most out of this device.
Advanced Motion Detection and Notifications
One of the primary highlights of the Wyze device is its superior motion detection capability. It utilizes innovative technology to sense movement and automatically send notifications to the user’s mobile device. This feature is especially useful for real-time monitoring and ensuring immediate response to potential issues.
Advanced audio recognition is another significant feature of Wyze Camera. This feature enables the camera to recognize distinct sounds like smoke alarms or glass breaking and alert the user, providing another level of security.
Crystal Clear Imaging
Wyze offers superior image quality, with high-resolution video streaming that presents clear, detailed images. This feature is complemented by the camera’s ability to enable 8x digital zoom, which allows close-up views of any section, enhancing its effectiveness in identifying details in recorded footage.
- Night Vision: In addition, Wyze Cameras are equipped with advanced night vision technology. The built-in infrared LEDs ensure clear imaging even in complete darkness, allowing for 24/7 monitoring.
- Wide-angle views: These cameras allow for wide-angle views, covering a large area in their field of vision, hence minimizing blind spots.
Two-way Communication
Another impressive feature of Wyze Cameras is the two-way communication function. This feature offers the convenience of interacting with family members or pets at home, enhancing ease of use directly from your smartphone.
From the comprehensive coverage to advanced alert features and two-way communication, the Wyze Camera provides a range of benefits. Understanding these features can help ensure you make the most of your device and improve your home security system effectively.
Out of the Box: First Look at Your New Wyze Camera
Once you receive your Wyze Camera, the first thing you’ll need to do is to carefully unbox it and examine the contents. To help you ensure that you have all necessary pieces to get started, we’ve outlined the steps below.
Unpacking Your Wyze Camera
Bearing in mind the importance of handling your camera with care, proceed through the following:
- Start by opening the box. Inside, you should find camera hardware, a Quick Start Guide, power adapter, and a USB cable.
- Lift out the camera taking care not to touch the lens.
- Look for the power adapter and USB cable. Keep in mind that the power adapter is needed to plug the camera into a power source, and the USB cable is to connect the camera to the adapter.
Inspecting Your Wyze Camera
Next, make sure your Wyze camera is undamaged and ready for setup:
- Inspect the lens of the camera. Check to see that it’s not scratched or cracked. A clean lens ensures high picture quality.
- Check the body of the camera for any physical damage. Look out for dents, scratches or any other signs of damage.
- Review the USB cable and power adapter. Make sure the power adapter isn’t damaged and that the USB cable can connect properly.
Once you’ve unpacked and inspected all of the components of your Wyze camera, you are ready to move onto setting up your camera to enhance your home or office security.
Steps to Install and Configure the Wyze Application
The initial step towards interfacing with your Wyze Camera begins with the downloading and setting up of the Wyze app on your smartphone. This crucial guide breaks down these steps to help you complete the process seamlessly.
1. Installing the Wyze App
Firstly, head to your smartphone’s native app store. For Android users, this would be the Google Play Store, while iPhone users would use the Apple App Store. Once you’re in your respective app store, use the search bar and type ‘Wyze’. You’ll find the application appearing in the search list. Just click on ‘Install’ or ‘Get’. It’s a free app, so you do not need to pay anything to download it.
2. Setting up the Wyze App
Once the application is successfully installed, open it. You’ll be presented with the option to either log in or sign up. If you’re a new user, tap on ‘sign up’ to create a fresh account. You would need to provide a valid email address and create a password.
Upon successful registration, a confirmation email will be sent to your provided email address. Go to your email, and click on the confirmation link to verify your account. Following this verification, your Wyze app setup is complete. You can now proceed to log in with your verified account details.
3. Connecting the Wyze Camera
With the Wyze app all set up, you’re now ready to connect it with the Wyze Camera. You will see an option labeled ‘Add a Product’ or ‘+’. Tap on this button and follow the given instructions to add and connect your Wyze Camera.
Please note that your smartphone and Wyze Camera need to be connected to the same Wi-Fi network during the initial camera setup. After that, you can access your camera from any location using the Wyze app.
Establishing a User Profile with the Wyze Surveillance System
Initiating a user profile with the Wyze Surveillance system necessitates a few simple steps to assure seamless operation of your Wyze camera. Let’s walk through the straightforward process of setting up an account.
The Process of Setting Up an Account
The first requirement is to download the Wyze app on your mobile device. The software is compatible with iOS and Android phones and tablets, and can be found on both the Apple App Store and Google Play Store. Simply type ‘Wyze’ in the search field and click ‘install’ after locating the app.
Once the Wyze app has been successfully downloaded and installed on your device, tap ‘Open’ to launch the app. You will be greeted with a welcome screen. Here, select ‘Sign Up’ to commence the registration process.
For user registration, it is essential to your email address and generate a password. Make sure your password is unique and strong to ensure the security of your account. After inputting these details, tap on ‘Continue’. An email will be sent to the registered address which contains a unique verification code. You will need to enter this code to complete the registration process.
After verification of your email, you are now a part of the Wyze community. Logging into your account allows you to connect and control your Wyze cameras conveniently.
Remember, save these login details securely as you will need them every time you want to access your Wyze account
Getting started with the Wyze surveillance system is as simple as these steps.
Integrating a Fresh Wyze Camera into your User Profile
Once you’ve decided to expand your home security system with another Wyze camera, setting it up with your account is a straightforward task. The entire process, from unpacking to active surveillance, can be completed in just a few easy steps.
Step 1: Preparing your Wyze Camera
Begin your set up by powering on your newly-acquired Wyze camera. To do this, connect the USB cable to the power adapter and then to the camera. Ensure that your device is connected to a power outlet. This critical step ensures that your camera is functional and ready to be added to your Wyze account.
Step 2: Accessing the Wyze Application
Next, access your Wyze account via the Wyze application on your smartphone. To add your new camera, find and tap the ‘+’ (plus) icon located in the upper left corner of your application’s home page.
Step 3: Connecting the Wyze Camera
Click on ‘Add a Product’ and select the camera model from the list in the application. Follow the on-screen prompts to connect your Wyze camera to Wi-Fi. An important note here is to ensure the camera and your smartphone are connected to the same Wi-Fi network.
Step 4: Scanning the QR Code
Justly, your Wyze app will generate a QR code, which needs to be scanned by the Wyze camera. Hold your phone 5-8 inches away from the camera so it can effectively scan the QR code. Post successful scanning, a voice prompt from the camera will echo, confirming the successful scan.
Step 5: Naming your Wyze Camera
Once the camera is connected, the last step is to name the camera. You’d want to make this specific, especially if you’re managing multiple cameras. For instance, names like ‘Front Door’, ‘Backyard’, ‘Living Room’ make it easier to distinguish between different cameras.
There you have it! Your new Wyze camera should now be set up successfully within your Wyze account, and positioned to enhance your existing home security system.
How to Link Your Wyze Camera with Your Wireless Network
When setting up your Wyze camera to work with your Wi-Fi network, it’s essential to ensure that your camera and Wi-Fi have a reliable and secure connection. This will not only enhance the performance of your camera but also boost its functionality. Here are some sequentially-arranged steps to connect your Wyze cam with your Wi-Fi.
Enabling Wi-Fi for your Wyze Cam
At the initial stage, ensure your Wyze camera is successfully installed and plugged into a power source. Open the Wyze app on your mobile device and follow these directives:
- )
Tap on the plus sign at the middle lower part of the screen, which is the ‘add a product’ option while on the homepage. It will bring a list of Wyze products.
- )
Select ‘Wyze Cam’ from the available list of products, which should prompt your device to ask for permission to access the device’s camera.
- )
Grant this by tapping ‘allow’ and get your Wyze Cam barcode ready for scanning.
- )
Once the barcode is scanned successfully, press ‘next.’ This should prompt you to enter your Wi-Fi details.
Take note: The credentials you’ll input should match those of the Wi-Fi you want your Wyze cam to connect with. Confirm your details before clicking on ‘Next.’ Your
Wyze Cam is now connecting with your Wi-Fi – this is confirmed by two rotating arrows on your Wyze Cam.
Take a moment to position your Wyze Cam effectively to maximize its coverage range and ensure excellent Wi-Fi signal strength. By achieving a solid Wi-Fi connection, you’ll optimize the performance of your Wyze cam, leading to high-quality real-time video feeds and instant alerts notification.
Fitting and Placement of Your Wyze Surveillance Device
Proper installation of your Wyze surveillance device significantly affects how effective it will be. The way it’s positioned is vital in achieving an optimal view of the surroundings for your security needs. Here are some essential steps and tips to guide you to mount and position your gadget effectively.
Mounting Your Wyze Device
First, you need to decide on the mounting location. This location should be a place where the unit will offer the best view of your property while being shielded from elements like rain or direct sunlight. Usually, installing it by the front or back doors or any other entry points is a good option.
After identifying a suitable location, it’s time to mount your gadget. The unit comes with a mounting bracket in the package. To fix this bracket, clean the surface first and then peel off the sticky tape from the bracket and press it onto the wall firmly. Make sure that the surface is flat enough for the bracket to better adhere.
Positioning Your Wyze gadget
Picking an optimal position is crucial to get the best coverage. Try to mount your device as high as possible for a broader viewing angle. But don’t place it too high; the rule of thumb is to place it 9 feet off the ground, which is out of reach of a person trying to disable it and low enough to capture facial details.
Moreover, remember to orient it appropriately to avoid recordings of unnecessary areas. For instance, if positioned near windows, make sure it’s not pointing towards the window as direct sunlight will likely affect visibility.
Finally, you can use the Wyze app to fine-tune your gadget’s positioning. Check different views from the app and adjust the gadget until you get an optimal and satisfactory viewing angle.
In conclusion, effective fitting and placement of your Wyze surveillance device are pretty straightforward. All you need is to find a suitable location, mount it securely and position it accurately. With that, your device will offer the best possible coverage for your security needs.
Mastering the User Interface of the Wyze Application
Once you have successfully connected your Wyze camera, it’s paramount to become familiar with the Wyze App’s user interface to maximize its features. This provides a smooth flow in performing various functions such as live viewing, replaying of videos, or adjusting the camera settings.
Getting around the Home Screen of the Wyze App
The home screen forms the central hub of the Wyze application. Here, you’ll see an organized display of all your Wyze devices in a grid-like configuration, each with their respective thumbnail and name. From this screen, you can swiftly access individual camera controls by tapping on the desired camera.
To add a new Wyze device, simply click the plus (+) sign at the top left corner. If you’d like to share access to your devices with other users, the ‘Shared User’ option, which can be accessed from your Account tab, will assist.
Understanding the Device Screen
Upon selecting a specific device from the home screen, you will be directed to the device screen. This screen provides live footage from your selected Wyze camera, with key operational controls distributed at the bottom. These controls allow you to perform various actions such as:
- Take Photo: This option enables you to capture still images from the live footage.
- Record: This initiates a manual recording of the live footage.
- Speak: Using this, you can communicate directly through the camera to people or pets in view.
- More: Under this button, there are extra settings like turning on/off the motion tagging or creating automated time-lapse videos.
At the top of the device screen, users can also find a gear icon which directs to the camera’s settings. It is here you can adjust the detection settings, alert schedules, camera status light, and more.
The Events Tab
Located in the bottom menu, the events tab captures all motion and sound-triggered video clips recorded by the Wyze camera. The clips are organized in reverse chronological order, making it straightforward for you to review recent events.
Addressing Regular Wyze Cam Connectivity Hitches
If you come across challenges when setting up your Wyze Cam, don’t fret. Most issues are easily solvable by understanding the root cause. Here’s a quick guide to help you troubleshoot common connectivity problems associated with the Wyze Cam.
Weak Wi-Fi Signal
A weak Wi-Fi signal can lead to frequent disconnections or failure to connect. Make sure your Wyze Cam is within the router’s range. Use an extender if necessary, and switch to a more powerful router if the problem persists.
Incorrect Wi-Fi Information
Ensure you have entered the correct network credentials. Incorrect password or SSID is the most common reason for connection failure. Double-check the credentials and consider resetting your password if you can’t recall it accurately.
Outdated Wyze App or Firmware
Ensure that your Wyze app and the camera’s firmware are up to date. Frequent updates are made available for squashing bugs, improving performance, and adding new features, making this a necessary step in addressing connectivity issues. Visit your App Store, Google Play, or the Wyze website to verify your software and firmware’s currentness.
Incompatibility issues
Keep in mind that the Wyze Cam is only compatible with 2.4GHz Wi-Fi networks. If your Wi-Fi uses 5GHz or other frequencies, your camera won’t connect. Adjust your router settings to include a 2.4GHz bandwidth or purchase a dual-band router that can operate on both frequencies simultaneously.
Camera Setup Errors
Confirm that your Wyze Cam is correctly set up. Double-check all connections; make sure the plug is securely inserted and the power is on. Also, verify whether your device has been correctly linked through the Wyze app.
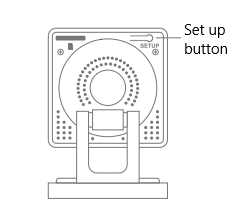
Still Can’t Connect?
If the above solutions don’t work, you might consider resetting your Wyze Cam. You can restore the camera to its factory settings by pressing the setup button for 10 seconds. After the reset, set up the camera again by following the included step-by-step guide.
Ensuring Your Wyze Surveillance Device Operates at Peak Efficiency
Regular Checkups and Cleaning
Over time, any piece of technology can accumulate dust and grime, potentially interfering with its ability to function properly. To ensure that your Wyze surveillance device is always in the best possible condition, it’s crucial to clean it regularly. Gently dust off the surface of the camera with a soft brush or a can of compressed air. If there are stubborn smudges, gently wipe them off with a soft, damp cloth. Be sure to not let water get into the device, which can damage the camera’s internal mechanisms.
Updating Your Firmware Regularly
Like all tech devices, your Wyze camera is regularly updated by the manufacturer to patch any vulnerabilities, improve functionality, and add new features. Ensure you’re running the latest version of the software by checking for updates in the Wyze app. Regular updates will help your camera perform at its optimal capacity.
Proper Placement
The placement of your Wyze camera can greatly affect its performance. Avoid placing it near sources of heat or humidity and try to keep it out of direct sunlight. These factors can adversely affect its performance or even its lifespan. Ensure the camera has a clear, unobstructed view of the area you’re monitoring. Regularly check the view from the camera in your Wyze app to ensure it hasn’t been inadvertently moved or blocked.
Handling with care
Wyzecams are designed to be robust, but too much rough handling can decrease their efficiency. When adjusting your camera’s position, handle it gently to avoid shaking or dropping it. If the camera is constant vibration or motion, this can wear down the hardware over time. Make sure the mounting area is secure and stable before attaching the camera.
Network Connectivity
Maintaining a robust internet connection is also critical to your camera’s performance. The Wyze Cam requires a reliable wifi connection to operate optimally. If your Wi-Fi signal is weak where your camera is located, consider using a Wi-Fi extender or moving your router closer to the camera.
FAQ: How to connect to wyze camera
How frequently should I clean the lens of my Wyze camera?
The lens should ideally be cleaned once a month. However, if your Wyze camera is located outdoors or in a dusty environment, you may need to clean it more frequently.
Why should I regularly update my Wyze camera’s firmware?
Regularly updating your Wyze camera’s firmware ensures that you have the latest features and security updates. It can also fix bugs and improve the performance of your camera, making it more reliable.
How can I improve the Wi-Fi connection for my Wyze camera?
You can improve the Wi-Fi connection for your Wyze camera by ensuring your camera is within range of your Wi-Fi router. Reducing barriers or obstructions between the camera and the router can also improve the signal.
What should I do if my Wyze camera’s image quality is poor?
If your Wyze camera’s image quality is poor, check that the camera lens is clean. If the lens is clean and the image quality is still poor, try adjusting the camera’s position or check the Wi-Fi connection. If the problem persists, please contact Wyze customer service.
Can I use my Wyze camera outside, and how can I maintain it?
Yes, certain models of Wyze cameras can be used outdoors. To maintain it, you should ensure that it’s installed in a covered area to protect it from extreme weather. Check the camera regularly to ensure that it’s clean and functioning properly. Remember to check the Wi-Fi signal strength, as outdoor cameras are usually further from the router.