Table of Contents
If you’ve decided to boost your home security by investing in a Ring Camera, you’ve made an excellent choice. This compact, smart device is not only user-friendly, but it also offers top-notch safety features. However, to reap all the benefits and ensure it functions efficiently, you need to install it correctly. This may sound intimidating, but don’t worry! This article is here to serve as an uncomplicated, step-by-step guide on how to set up your Ring Camera.
Firstly, why even consider having a Ring Camera? A Ring Camera is an advanced home security device that allows you to monitor your home remotely. It offers features such as night vision, motion detection, and two-way talk. To top it off, it is designed for easy installation and operation, making it an ideal choice not just for homeowners, but for renters as well.
In this guide, we’ll be addressing each step you need to follow to get your Ring Camera up and running. From out-of-the-box to fully mounted and operational, we have you covered. So, eliminate the installation anxiety from your mind, don a confident spirit, and let’s dive into our simple guide on Ring Camera installation.
Grasping the Advantages of Using a Ring Surveillance Device
Equipping your home with a Ring surveillance device provides several benefits that can significantly enhance your home security. Here is a definitive rundown of the advantages of having this technologically advanced security device.
Real-time Surveillance
The first and foremost advantage of a Ring security gadget is its real-time surveillance capability. With its live-streaming feature, you can monitor your home straight from your smartphone, computer, or tablet no matter where you are located. This guarantees that you can stay informed about what is happening in and around your home at all times.
Intruder Alerts
Another remarkable feature of the Ring security equipment is its motion detection technology. It can effectively sense any movement in its field of view and send instant alerts to your device. With such prompt notifications, you can react swiftly to unexpected activities, boosting the safety of your home.
Two-way Communication
The communication feature of Ring camera gear stands out as well. With its two-way audio attribute, you are able to not only see but also communicate with the person at your doorstep without having to open your door. This gives an additional layer of safety by giving you the chance to verify the identity of visitors.
Data Storage and Sharing
The Ring security device also offers convenient cloud storage for your video footage. This allows you to archive your recordings, review them later, or share them with relevant parties if needed. This element ensures that valuable evidence is always at your disposal.
Clearly, a Ring camera system serves not only as an essential tool for home security but also as a comprehensive solution for all surveillance needs. By understanding its benefits, you can effectively make the most out of your device.
Deciding on the Most Suitable Spot for Your Ring Video Surveillance System
When you’re setting up your Ring surveillance camera, one of the most important steps is deciding on the location. The place you choose can greatly influence the effectiveness of your security system. This guide will help you in making an informed decision.
Visibility and Field of View
Your Ring camera’s position should allow a wide, unobstructed view of the area you want to monitor. This could be your front yard, back yard, hallway, or any other area- depending on your needs. Remember, the objective is to avoid blind spots.
Height of Installation
The height at which you install your Ring camera also plays a significant role. Ensure it’s installed at a sufficient elevation to gain a broad view, but within reach for easy access and maintenance. Roughly, 9 feet above the ground tends to work well for most properties.
Lighting Conditions
Consider the lighting conditions of the area your camera will monitor. While Ring cameras have night vision, well-lit areas can provide clearer footage, especially during evenings. If you wish to monitor a dark area, you might want to add supplementary lighting.
Wi-Fi Connectivity
Since Ring cameras operate wirelessly, the chosen location should be within your Wi-Fi network range. If the signal is weak, the camera may not function properly. You may consider getting a Wi-Fi range extender if there are connectivity issues but the location is otherwise optimal.
Protection from Weather
Lastly, although Ring cameras are designed to be weather resistant, extreme weather conditions might affect their performance. Try to place your camera in a spot that’s protected from elements, like under eaves or canopies.
Please note that the location ultimately depends on your individual requirements and the nature of the property under surveillance. Consider all these factors to optimize your security system implementation and make the most out of your Ring camera.
The Box Reveal: Your Ring Camera Kit Contents
Unveiling your Ring camera kit can be an exciting event. After you remove the outer wrapping, you’ll find a pack that contains everything you would need to install and set up your Ring camera. Here’s a simple breakdown of what the box contains:
- A Ring Camera: This is the heart of your security system. It will capture video and communicate with your mobile device.
- Mounting Bracket: This is a critical component for installation. It helps you secure and align the camera on the wall so that it covers the area that needs surveillance.
- Installation Tools: These are the instruments that assist in the camera setup. It usually contains a screwdriver, screws, and other necessary parts.
- User Manual: This is the instruction guide, an indispensable resource that offers step-by-step directions to set up the camera and mount it effectively.
- Batteries or Power Adapter: Depending on the model, your Ring camera may either be battery-powered or needs to be plugged in for power supply.
Your Ring Camera kit may also include additional components depending on the model. Some versions come with a Ring Chime Pro device that extends your Wi-Fi signal to ensure your Ring devices can connect to the internet. Others might include a yard sign and window decals to deter potential intruders.
Ensure that all elements mentioned in your manual are present in your box, and they are in good condition. Pull out each piece carefully to avoid any damage. Now you’re set to proceed with the installation of your Ring Camera!
Preparing Your Ring Account to Operate Your Security Camera
Before you proceed with the actual installation of your Ring security camera, it is essential you arrange for access to your Ring account. This account conducts the infrastructural role for the conduct and control of your camera, thus merits your careful attention.
Ring Account Creation
Your first step involves creating a Ring account if you do not already have one. To do this, visit the Ring website or download the Ring app on your smartphone. Simply follow the prompts to create an account using your email and create a secure password. After creating your account, verify it via the link sent to your registered email address.
This account opens your gateway to access countless services provided by Ring. Not only can you remotely access your Ring camera, but this account also allows you to view previous footage, receive alerts, and even share exceptional events with the community.
Pairing your Ring Camera with your Ring Account
To connect your Ring camera to your Ring account, open the Ring app on your smart device. In the top right corner, select ‘Set Up Device’, then choose ‘Security Cams’. Follow the subsequent prompts, making sure to enter the unique code found on your Ring device during the process.
Once completed, your Ring account is now paired perfectly with your camera, and you may now use your account to view live footage, access past recording, or to modify your camera settings to your satisfaction.
Ring Account Management
It is noteworthy to remember security while operating your Ring account. Always log out after accessing your account on public devices, regularly update your password and keep your account recovery details up-to-date.
Good Ring account management also involves keeping the app updated. This ensures optimal performance, access to new features, and continuous security enhancements.
Once your account is set up and managed consistently, you are prepared to install and experience the best from your Ring camera.
Setting Up Your Ring Camera: A Guide to Establishing Application and WiFi Settings
The initial configuration of your new Ring Camera is an essential process. This includes successfully connecting the Ring application on your smartphone or tablet and ensuring a competent WiFi connection.
Ring Application Configuration
Step 1: The commencement of the Ring Camera set up starts by installing the official Ring application. This application is accessible for free download on Android and iOS devices.
Step 2: After successfully installing the app, open it and follow prompts to create a new account if you don’t already have one. For existing users, log-in to your account.
Step 3: On the top right side of the dashboard, click on the Set Up Device option. On the subsequent page, select cameras and choose the type of Ring Camera you intend to configure.
WiFi Connectivity
The strength and stability of your WiFi connection determine the functionality of your Ring Camera. Here are the steps to connect your camera to the WiFi network.
Step 1: After selecting your camera type in the app, a series of instructions will be displayed. These will guide you through the process of connecting your Ring device to your WiFi network.
Step 2: Key in your WiFi network credentials when prompted. Ensure to enter the correct username and password.
Step 3: A successful connection will be confirmed by a voice message from the Ring Camera.
Confirming the status of your connection can be done via the Ring application on your device under the Device Health option. Keep your device within a reasonable range of your WiFi router for optimal performance.
Procedure of Installing the Mount Bracket for the Surveillance Camera from Ring
Setting up the mount bracket would be your initial step towards readying your Ring camera for use. This task is straightforward, and anyone can accomplish it, even without specialized technical skills. It’s all about following the guidelines as stipulated in the manual.
Tools and Materials Needed
Before you commence this installation exercise, ensure you’ve the necessary tools and materials at your disposal. Everything needed for this task comes along with your camera from Ring except for some few tools like a power drill and a pencil for marking drill points., These include:
- A bracket (which comes along with the camera)
- A power drill and drill bits (not provided by Ring)
- Installation screws and accompanying anchors (provided by Ring)
- A spirit level (for ensuring the bracket is level, it may not be provided by Ring)
- A pencil or pen to help in marking drilling points (not provided by Ring).
Once you have all the tools and materials necessary for the installation of the bracket, you can confidently commence the process.
Bracket Installation Steps
Step One: Identify an appropriate installation point on your wall for the camera. This should be a vantage point where the camera can capture the maximum view. It’s recommended that you should set up your camera about 9 feet from the ground to enable a much wider view.
Step Two: Hold your mount bracket against the wall and use the spirit level to ensure it’s level. With a pencil, mark the drill holes through the holes in the mount bracket.
Step Three: Using a power drill, drill the earlier marked points on your wall. Ensure the drill bit size matches the size of your wall anchors. After drilling, push in the wall anchors.
Final Step: Align your mount bracket to the drilled holes and screw it to the wall. Ensure it’s tightly secured to prevent any wobbling, which might affect the camera’s view.
Once the mount bracket is up and secure, you’re then set to mount your Ring camera and proceed to set it up. Remember to follow the technicians’ guidelines to avoid any complications.
Setting Up Your Ring Security Camera on the Mount
Once you have selected the best location for your Ring surveillance gadget and the mount is fastened securely, it’s time to install the camera onto the bracket. Precise handling and following the manual’s direction will ensure an effective setup.
Fastening the Camera to the Attached Bracket
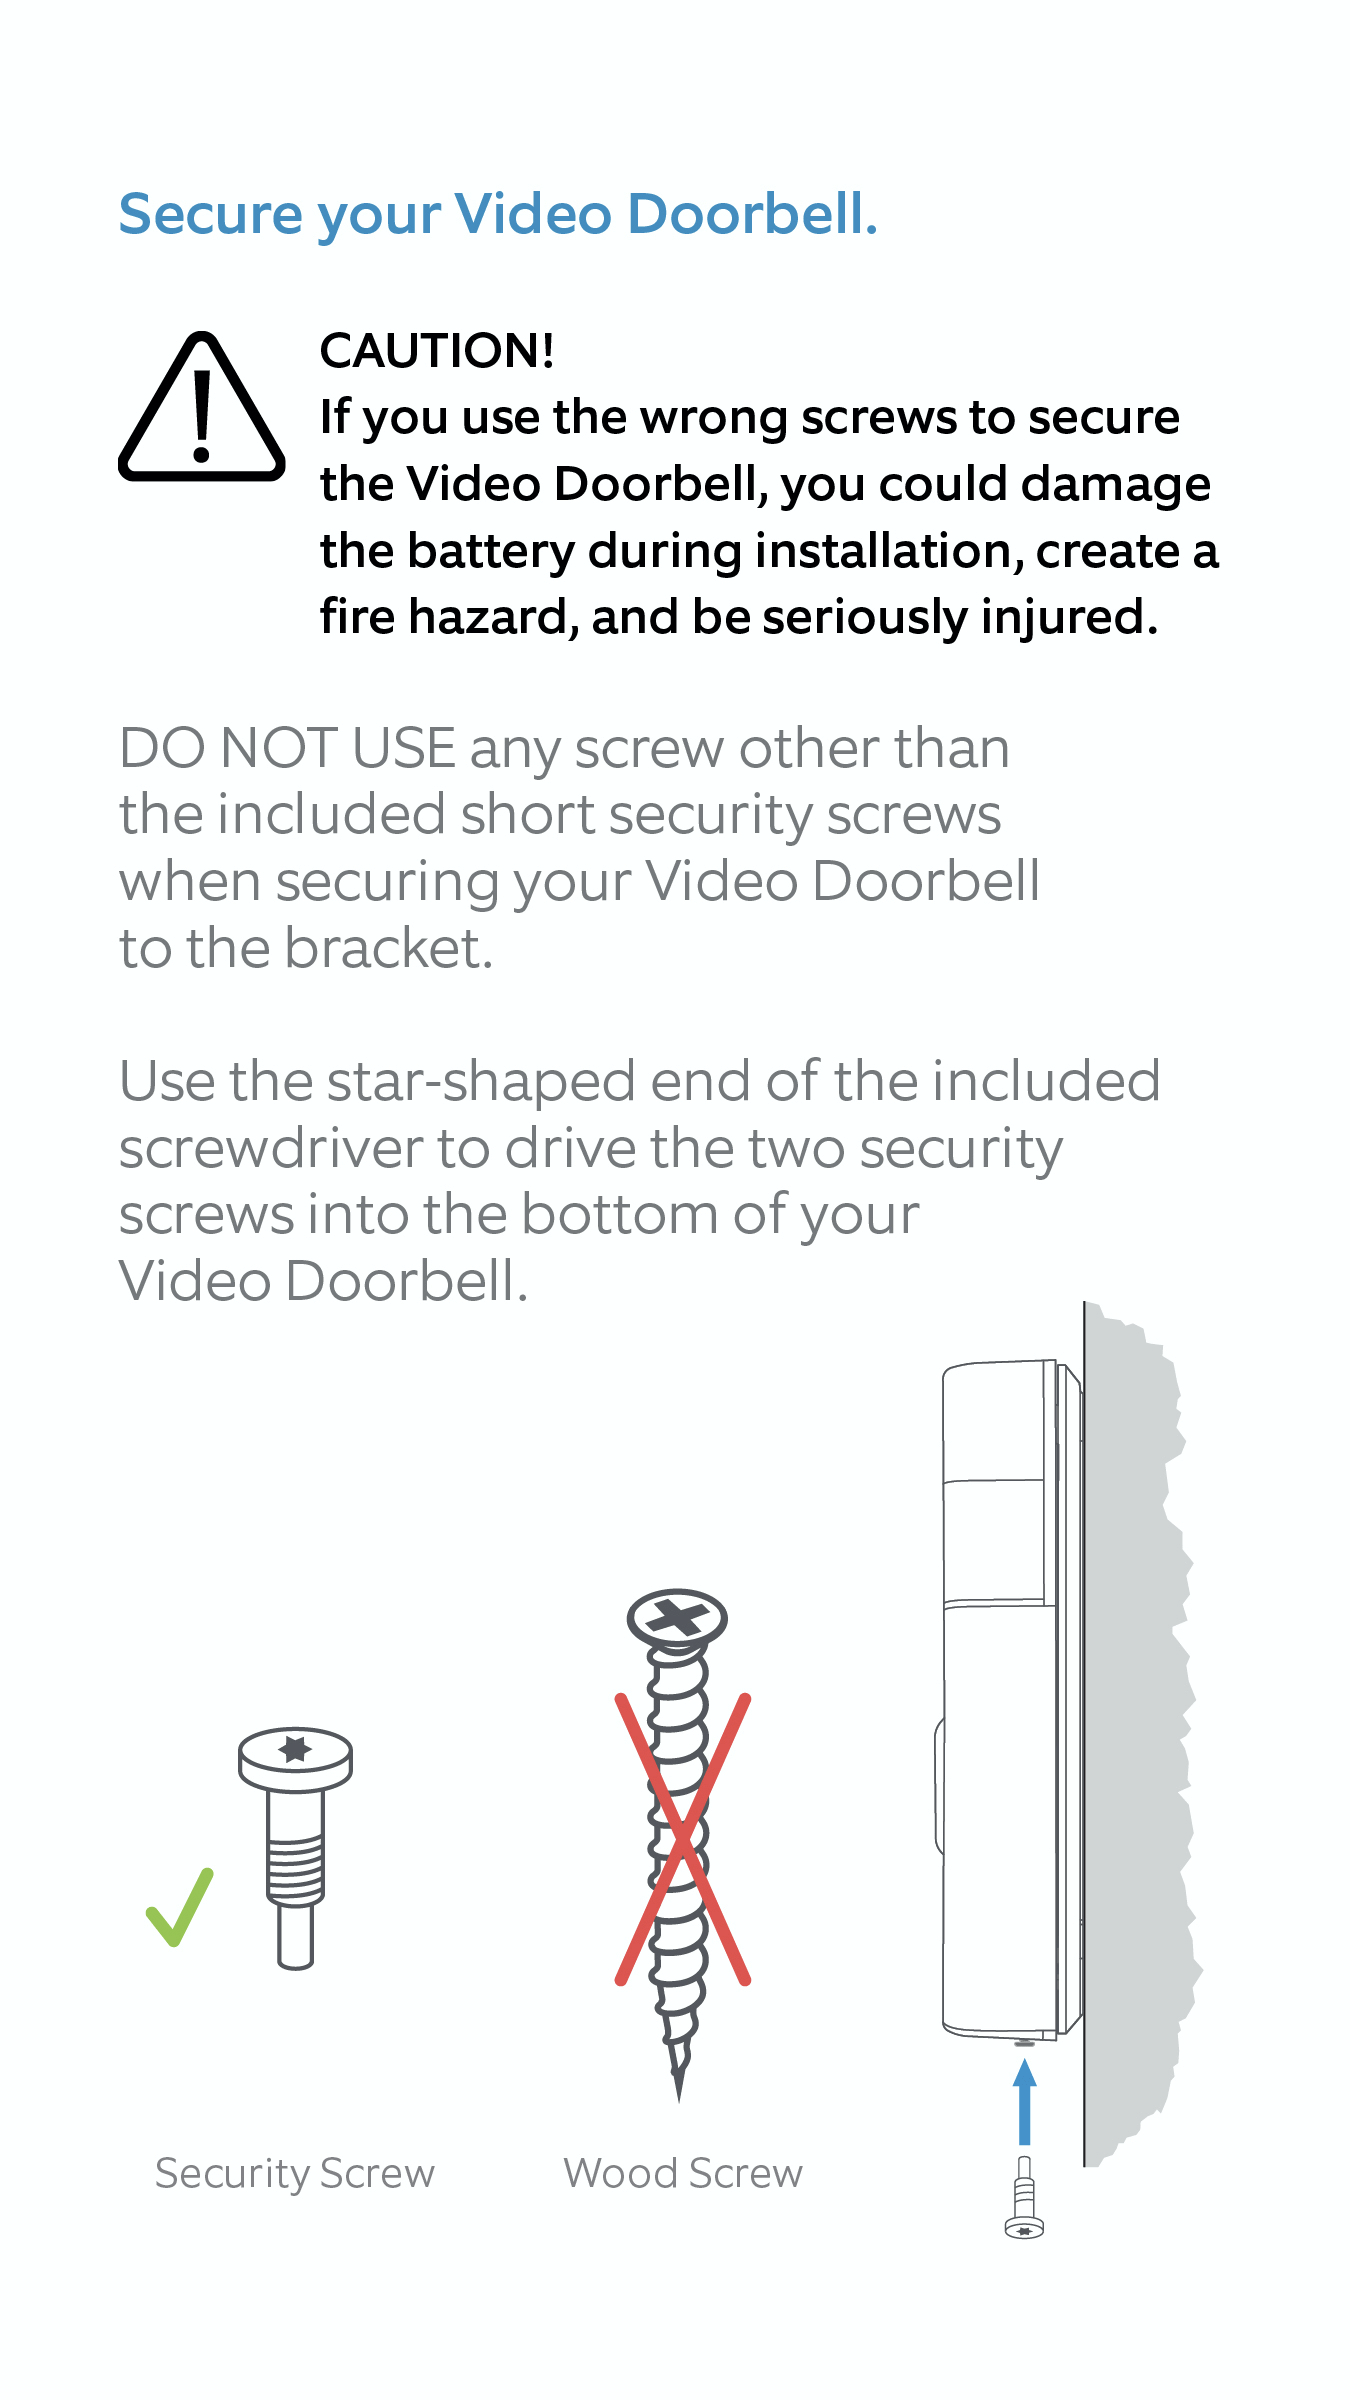
With the Ring device and the provided security screw, place your Ring camera onto the mounting bracket. Adjust the camera to the angle you want for optimal surveillance. Using the screwdriver, tighten the screw into the hole located at the base of the ring camera. Make sure it’s secure so the camera will remain steady.
Remember:: Do not overtighten the screw as it might damage the device.This action can compromise the camera’s performance and might void your warranty.
Here’s a simple step-by-step guide to help you mount your camera:
- Position the Ring camera onto the mounted bracket, ensuring it aligns with the mount’s slots.
- Adjust the Ring camera to your preferred angle for coverage.
- Insert and tighten the security screw using the provided screwdriver. Don’t force the screw; stop once resistance is felt.
- Double-check the Ring camera’s view and re-adjust the angle if necessary.
With this in place, you’ve successfully installed your Ring camera onto the bracket. The final step will be getting it powered up and linked to your network for optimal surveillance.
Securing the Best Position for Your Ring Security Camera
Quality of footage and comprehensive coverage are crucial factors for the effectiveness of any security camera, including the Ring Camera. Achieving the right position and angle for your Ring Security Camera might seem straightforward, but it requires careful thought and consideration.
Location and Height
The first step towards achieving the optimal position involves determining the perfect spot for the camera. Ideally, the camera should be mounted at a place that offers comprehensive coverage of your compound and crucial entry points. Additionally, mount the device at a height of 9 feet above the ground. This prevents easy access or tampering with the camera, and also offers the best vantage point.
Angle adjustment
After mounting your camera according to the recommended height, the next step is adjusting the camera angle. Getting the right angle is essential as it determines the field of view captured by the lens. Aim for a broad-angle view that can cover the maximum area possible. Tilt your camera such, that it captures the main paths leading to your home. This will enhance the camera’s motion sensitivity feature, thereby enabling clear and precise footage.
Considering Sun Glare
Another vital point to consider when positioning your Ring Security Camera is sunlight glare. Placing the camera facing the sun may compromise the quality of the image and video. As a result, it is prudent to adjust the camera’s angle in such a way that it is shady or protected from direct harsh sunlight, especially during sunrise and sunset.
Proper installation and positioning are crucial for the effectiveness of your Ring Security Camera. By following the above steps, you can improve footage quality, coverage area, and overall security.
Connecting Your Ring Security Camera with Other Devices from Ring
Setting up your Ring camera is just the first step. An even more enhanced security system involves integrating your camera with other Ring devices. Not only does this make your home more secure, but it also makes it more convenient for you. For instance, the system can be configured in such a way that the Ring Video Doorbell rings your Ring Chime when it detects motion.
Here’s a simple walk-through for device integration:
To start with, open the Ring app and ensure both your Ring camera and other Ring devices are set up independently first. Once that’s done, follow these steps:
- In the Ring app, touch the three lines on the upper left side to open the main menu.
- Select Devices, and then choose the Ring camera you want to link.
- In the device settings, you will find an option named Linked Devices. Tap it.
- You will see a list of devices that can be linked with your Ring camera. Find and select the devices you want to link.
- Click on Save to complete the process.
You must note, that once your other Ring devices are linked with your Ring camera, any motion detected by either one will set off an event in the other. For example, if your Ring doorbell senses movement on your doorstep, your Ring camera will start recording, giving you a wider field of view of what’s happening.
Linking your Ring camera with other Ring devices will allow you to create a web of security around your home, enhancing its protection level while offering you peace of mind.
Solving Common Issues: When Your Security Camera by Ring Fails to Work
Unable to View Live Stream
Experiencing difficulties when trying to watch a live feed from your security camera can be a point of frustration. If you find yourself in this situation, start by checking that your internet connection is stable. A weak signal could be the culprit. You can generally overcome this by bringing the wireless router closer to your camera or vice versa.
Camera Disconnecting Frequently
In case your Ring Security Camera disconnects randomly from your Wi-Fi network, you might need to improve the Wi-Fi signal. Installing a Wi-Fi range extender could help in this case. Another cause could be outdated firmware. Consequently, ensure that your camera always has the latest firmware installed.
Not Recording Motion
If your Ring Camera isn’t able to detect movement, the root cause might be incorrect settings. Double-check that motion detection is enabled and configured correctly in your Ring app. If this isn’t the issue, some physical obstacles might be blocking the camera’s field of view. Thus, inspect the surrounding area and clear any blockages.
Camera Not Turning On
When your Ring Camera doesn’t power up, the most likely reasons are power or battery-related issues. Firstly, check whether the device is charged and connected to the power supply. For battery-powered models, ensure that the batteries are inserted correctly and have sufficient charge.
Inability to Access Your Account
Should you find yourself unable to sign into your Ring account, there’s a chance you’ve either forgotten your password or have been locked out of your account. In the former scenario, use the ‘forgot password’ feature to reset your password. If the latter is your issue, contact Ring’s support team for assistance.
Issues with Audio
Sound problems such as not being able to hear audio from the camera or encountering poor quality audio can also occur. Firstly, ensure the audio setting is turned on in your Ring app. Next, check your mobile device’s volume settings. If neither of these measures work, your camera might have a hardware issue, and it’s best to contact Ring’s support team in this case.
Ensuring the Longevity of Your Surveillance Camera from Ring
Preserving your surveillance camera from Ring for long periods requires regular maintenance and care. The following steps offer an easy, routine approach to secure its high performance and longevity.
Regularly Clean Your Device
It’s important to keep your surveillance device clean to ensure clear imagery. An accumulation of dust, cobwebs, or other debris might blur the camera’s view. Use a soft, clean cloth softly wipe the camera and its lens. However, do not apply any cleaning solutions or liquids to any part of the device.
Checking for Software and Firmware Updates
Manufacturers often release software or firmware updates to fix bugs, add new features or enhance device security. Keep your Ring surveillance system up-to-date by regularly checking for and installing these updates. This can typically be done through the associated app or website.
- Ensure your device is connected to Wi-Fi to receive updates.
- Check for updates in the settings of your Ring app.
- Install any available updates immediately.
Inspecting the Physical Installation
Periodically check your Ring camera’s physical setup. With time and exposure to weather changes, the mounting hardware may become loose or corroded. Sheer off rust, tighten any loosened screws, and replace components if necessary to ensure firm mounting.
Assessing the Camera’s Performance Regularly
Periodically check your camera’s footage to ensure it’s functioning optimally. This entails checking the quality of images and videos, as well as verifying that digital features such as motion detection and night vision remain functional.
Resetting the Device
Occasionally, your device might experience technical hitches due to prolonged use. Should such arise, consider resetting your Ring device to the manufacturer’s default settings. After the reset, you will need to reconfigure your device’s settings to your liking.
Table of actions on maintenance:
| Action | Description |
|---|---|
| Cleaning | Keep your device dust and debris free for optimal image quality. |
| Updating Software | Regularly check for and install software or firmware updates. |
| Physical Inspection | Check and adjust the mounting hardware regularly. |
| Performance Assessment | Review the footage regularly to ensure the camera functions properly. |
| Resetting | If necessary, reset the device to its default settings. |
In conclusion, treating your Ring camera to regular service and maintenance not only ensures its longevity but also boosts its performance, ultimately enhancing the security of your home.
FAQ: How to mount ring camera
How often should I clean my Ring Camera?
You should clean your Ring Camera every 3 to 6 months to ensure it remains in good working condition. However, it may vary depending on your local weather conditions.
What should I use to clean the lens of my Ring Camera?
You can use a microfiber cloth to gently clean the lens. Never use harsh chemicals or abrasive materials as they might scratch or damage the lens.
What can I do to prolong the battery life of my Ring Camera?
Some measures to prolong the battery life include optimizing motion settings, reducing the frequency of live view, and ensuring that the camera is within good signal range of your Wi-Fi router to prevent frequent reconnections.
How can I ensure that my Ring Camera remains weather-resistant?
Ensure that all the covers and compartments are securely closed. Also, do not expose the camera to weather conditions not recommended by the manufacturer.
Can I use any type of cleaning material to clean my Ring Camera?
No, you should avoid using harsh or abrasive cleaning materials as these may damage the camera. It is recommended to use a soft cloth to gently wipe off dust and dirt.
What should I do if my Ring Camera is not functioning after prolonged use?
Try a basic reset or power cycle. If that doesn’t work, contact Ring’s customer support for assistance.
Should I turn off my Ring Camera when I’m not using it to preserve its lifespan?
No, Ring Cameras are designed to be used continuously. Turning them off and on frequently may actually reduce their lifespan.
Do I need to update my Ring Camera software for long-term use?
Yes, keeping your Ring Camera’s software updated ensures that you have the latest features and security patches, which will improve its performance and lifespan.
What practices can I adopt to ensure the long-term use of my ring camera?
Firstly, you should always keep your Ring Camera free from dust and dirt. Regularly clean both the face of the camera and the lens to maintain clear image quality. Avoid using harsh chemicals which might damage any finish or features. Secondly, protect the camera from extreme temperatures. Extreme heat or cold can affect the camera’s functionality. Finally, always keep your camera’s software updated. The updates often include bug fixes and improvements to ensure your camera run smoothly and effectively.
How often should I charge the battery of my Ring Camera to ensure its longevity?
It depends on the model of your Ring Camera and its usage. However, it’s generally a good practice to re-charge the battery when its capacity reaches around 10%. This prevents the battery from being completely drained which might affect its efficiency and lifespan. You can typically expect to charge your Ring Camera’s battery every few months. Regular software updates also include power management enhancements which can extend the battery life.