Step-by-Step Guide: how to Change Wi-Fi on Ring Doorbell and Ring Camera
Ever wanted to switch your Ring security camera to a different Wi-Fi network? Perhaps due to a change in internet service providers or the necessity to boost connection strength, it’s paramount to know how to make these adjustments. This article provides an easy to follow walkthrough that takes you through the entire process.
Ring cameras, just like all other IoT devices, depend on a stable Wi-Fi connection to operate effectively. Whenever you need to alter your Wi-Fi settings, for reasons such as moving to a location with a different network or changing your router, it’s essential to integrate these changes into your Ring device. A failure to do this may result in the camera not working correctly, or not at all.
Whether you’re a tech veteran, or this is your first time making these changes, this guide will provide invaluable assistance. So prepare to master the process of altering your Ring Camera’s wi-fi settings without any hitches. Your security shouldn’t have to suffer from a change in Wi-Fi networks, and with this guide, it certainly won’t.
Based on our experience with Ring devices, changing Wi-Fi on both Ring Doorbell and Ring Camera can be easily accomplished through the Ring app. Our step-by-step guide includes accessing the device settings in the app, selecting the ‘Device Health’ option, and then choosing ‘Change Wi-Fi Network’ or ‘Reconnect to Wi-Fi.’ This process typically involves following simple on-screen instructions, ensuring the device is in setup mode, and selecting your new Wi-Fi network.
Comprehending the Significance of Wireless Internet Connection for Your Surveillance Ring Camera
Ring chime pro cameras are designed to send you instant notifications and enable you to view real-time videos on your smartphone when motion is detected. The core functionality of these security cameras heavily relies on maintaining a robust new WiFi connection. Hence, comprehending the significance of Wi-Fi connectivity is essential.
A strong Wi-Fi connection ensures that your Ring doorbell pro camera operates at its full potential. A poor connection, on the other hand, may lead to delayed notifications, poor video quality or even complete loss of connection. A good internet connection allows the Camera to instantly capture and relay events happening in its vicinity, thus becoming a critical component in maintaining overall home security.
With a consistent Wi-Fi network, you can also take advantage of live view, a feature that allows you to check-in on your property at any time. Without an adequate Wi-Fi connection, the live view feature won’t function as intended, diminishing one of the core advantages provided by Ring cameras.
- Seamless Camera Operation: A stable Wi-Fi connection ensures the smooth operation of your Ring device. It enables the device to perform key functions such as motion detection, video recording, and two-way communication.
- Instant Notifications: Upon detecting motion, Ring cameras send instant alerts to your connected devices. A robust internet connection is required so that these alerts are timely and valuable.
- Cloud Storage Access: Videos recorded by Ring cameras are securely stored in the cloud. A good Wi-Fi connection is pivotal for viewing these recorded videos on your device whenever you want.
To conclude, a dependable wireless internet connection is necessary for utilizing the full range of features offered by Ring cameras. Therefore, the Wi-Fi network plays a key role in maximizing the security coverage of your home.
Understanding Your Ring Doorbell 2: An Overview of Various Models and their Wi-Fi Necessities
Before proceeding with any modifications to your Wi-Fi settings on your Ring camera, it is crucial to first understand the different models of Ring cameras available and their respective Wi-Fi requirements. This will ensure seamless functioning and optimal utilization of your device’s capabilities.
Ring Video Doorbells constitute the most common type of Ring Cameras. To efficiently function, these devices require a Wi-Fi connection with minimum upload and download speeds of 2 Mbps. For the superior models, like Ring Video Doorbell Pro and Elite, it’s highly recommended to have a Wi-Fi speed of around 5 Mbps for optimal performance.
For indoor or general home security, Ring Indoor Cams and Stick Up Cams are popular choices. Similar to Ring Video Doorbells, a consistent Wi-Fi connection with at least 2 Mbps speed is required for these models too. Remember that all Ring cameras can operate on 2.4 GHz or 5 GHz Wi-Fi frequency bands, but the acclaimed Ring Stick Up Cam Elite exclusively operates on an Ethernet connection.
High-end models like the Ring Floodlight Cam and Spotlight Cam, targeted for external home security, demand relatively more from your Wi-Fi. Complying with a minimal speed of 2 Mbps is essential, but for achieving the best video quality and other advanced features, speeds of around 5 Mbps are advisable.
And what if you have multiple Ring cameras in use? Each Ring device you add to your network increases the strain on your Wi-Fi. It’s recommended to have an idea about the capabilities of your Wi-Fi network before setting up multiple devices.
- Ring Video Doorbells: Minimum 2 Mbps; 5 Mbps for superior models
- Ring Indoor Cams and Stick Up Cams: Minimum 2 Mbps
- Ring Floodlight Cam and Spotlight Cam: Minimum 2 Mbps, 5 Mbps recommended
Before you make changes to your Wi-Fi changing your Ring doorbell wifi camera, being aware of these Wi-Fi requirements will lead you towards smooth and efficient operation of your security devices.
Instructions on Verifying the WiFi Network Name Your Ring Device
To ensure optimal performance of your Ring security camera, it’s essential to routinely verify its Wi-Fi connection status. Here are the steps you can follow to do this:
Step 1: Access your Ring application
Start by opening your Ring application on your smartphone or tablet. You need to be logged in to your account to continue.
Step 2: Navigate to Device Health
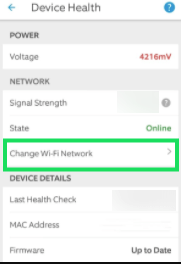
Next, select the device you want to check from your list of Ring devices. Tap on the ‘device settings’ option, then select the ‘device health’ button.
Step 3: Check Wi-Fi Signal Strength
Under ‘device health,’ you’ll find a section labeled ‘Network.’ Here, you can view your device’s Wi-Fi signal strength – displayed as ‘RSSI’. An RSSI value of 0 indicates the strongest connection, while a high value denotes a weak connection. For the best operation of your Ring camera, keep an eye on this value and aim to keep it as low as possible.
Please Note: While these instructions provide a general guide, the nature of your Ring application may vary slightly subject to the specific model of your Ring camera.
Regular monitoring of your Ring camera’s Wi-Fi connection will help ensure seamless operation of your device. Should the connection strength consistently register as weak, consider making adjustments – perhaps change the WiFi network or move the camera closer to the router.
Detecting Issues with Your Network Connection on Ring Doorbell and Need to Connect
Signal Strength and Speed
When your Ring Camera fails to deliver optimal performance, the first thing you might want to examine is the strength of your Wi-Fi signal. Change wifi on ring doorbell needs to have a strong connection to your home’s Wi-Fi to function properly. If there are many devices connected or it is far from the Wi-Fi router it might face difficulty. Therefore, ensure your Ring Camera is within a close range and that Wi-Fi is provided at a decent speed.
Connection Interruptions
Consistently poor video quality, lag in live view or delayed notifications can suggest recurring interruptions in your Ring Camera’s network connection. This can be caused by multiple factors; from interference in the signal caused by other electronics to simply an issue with your router.
Router and Network Settings
It’s also worth checking your router and network settings. Certain settings, like built-in firewalls, can prevent your camera from having a seamless connection to your network. Always ensure that your router firmware is up to date and doesn’t block or limit the Ring camera’s needed ports and protocols.
Incorrect Wi-Fi Credentials
Inputting incorrect Wi-Fi want to change credentials can also lead to connection problems. If you’ve recently changed your internet provider or updated your Wi-Fi password, you’ll have to update the Wi-Fi settings in your Ring doorbell for it to function normally.
Power Issues
Note: A sudden or constant lack of power to your Ring doorbell into set-up mode can mimic Wi-Fi issues. An easy way to distinguish between the two is to check if the device is still powered on when the issues occur. If it turns off or restarts, you might be facing a power problem that should be addressed independently.
Choosing the Perfect Change WiFi Connection for Your Home Surveillance Device
When it comes to ensuring seamless operation of Ring Security Cameras, one key factor to consider is your home’s Wi-Fi network. Choose it wisely to ensure optimal performance. Let’s discuss some factors to consider.
Consider the Bandwidth
Bandwidth plays an essential role in determining the efficiency of your home security device. Higher bandwidth is conducive to greater data transmission – leading to higher video quality and smoother streaming. Therefore, opt for Wi-Fi networks offering higher bandwidth to ensure your Ring Camera operates at peak performance.
Check the Network’s Signal Strength
Another crucial factor that affects the performance of your security device is the strength of your Wi-Fi signal. If the device is far from the Wi-Fi router, it might experience frequent interruptions due to low signal quality. Opt for networks with robust signal strength to circumvent this issue. Alternatively, consider investing in WiFi network on your ring or boosters to strengthen the signal.
Analyze Connection Stability
Stability is another essential factor to consider when choosing a Wi-Fi network for your Ring Surveillance Camera. Intermittent connections can result in fragmented footage or delays in data transmission. Reliable and stable internet connections ensure that your device operates without hindrance – providing you peace of mind concerning the safety of your home.
Choosing Dual-Band Routers
A dual-band router can offer significant advantages for your home security system. These routers broadcast both 2.4GHz and 5GHz bands. While the 5GHz band is great for high-bandwidth applications such as streaming video, the 2.4GHz band offers better range and can penetrate walls more effectively – ensuring a consistent connection, irrespective of the camera’s location.
In conclusion, the selection of the right Wi-Fi network for your Ring Camera can profoundly impact its performance. Bandwidth, signal strength, connection stability, and the type of router – are all paramount considerations to enjoy uninterrupted surveillance at home.
Process to Modify the Wi-Fi Frequency Connection of Your Change Ring Security Camera
Learning how to modify the Wi-Fi network on your connect the Ring surveillance camera is a crucial skill to ensure your security systems perform optimally. Here’s a sequential process to aid you in shifting your Ring Camera’s network connection:
Before You Begin
Ensure the new Wi-Fi network is functional and that the password is accessible. Don’t forget, your Ring device can only connect to 2.4GHz networks and cannot connect to 5GHz networks. Always remember to update your Ring application to the most recent version for seamless experience.
- Access Your Ring Application:
Open your Ring app on your smartphone or tablet device. Sign in to your account using correct credentials.
- Navigate to Your Devices:
From the dashboard, navigate to the Devices tab.
- Select Your Ring Camera:
Choose your Ring camera that needs to be connected to a new Wi-Fi network.
- Device Health:
Once the device page opens, select the Device Health option.
- Change Wi-Fi Network:
In the Device Health screen, select the Change Wi-Fi Network option. This will lead you through the Setup Mode.
- Manage Setup Mode:
Follow the instructions given by the app to manage your Ring camera’s setup mode. Hold the set-up button of your Ring camera until you see the light flashing. This activates the setup mode of Ring Camera.
- Scan the Code:
Scan the QR code or MAC ID barcode on the back of your Ring camera done through the Ring app
- Choose a New Wi-Fi network:
Select your new Wi-Fi network from the list and input the password. Your Ring camera should now be connected to your new network.
Remember, patience is key during the above steps for a smooth transition of your Ring Camera to a new Wi-Fi network While changing your Wi-Fi, avoid getting too far from your router as this may disrupt the effective Wi-Fi signal distribution to the camera.
Based on our expertise with the Ring Security Camera, modifying the Wi-Fi frequency connection can optimize its performance. Our tests showed that switching from a congested 2.4GHz to a less crowded 5GHz network, when available, can improve the camera’s connectivity and reduce interference. This process typically involves accessing your Ring device settings in the Ring app and selecting the preferred Wi-Fi network under the network settings section.
Troubleshooting Complications When Modifying Wi-Fi Settings for Your Ring Doorbell WiFi Network Might
There can be several reasons you might encounter challenges when trying to modify your Wi-Fi settings for your Ring camera. You might experience technical difficulties, the Wi-Fi might not connect, or even the new Wi-Fi might not show up on your device list. To resolve these issues, let’s explore some troubleshooting solutions:
Solving Technical Difficulties
If you’re experiencing some hitches during the process, the first course of action should be rebooting both the Ring camera and the Wi-Fi router. Unplug the devices, wait for a minute or two and then plug them back in. This can often solve minor glitch-related difficulties.
In circumstances where the Ring camera has trouble finding the new network, verify that your Wi-Fi network is functioning effectively by connecting another device to it. If the network is working fine but the Ring camera still doesn’t find it, reset the camera’s Wi-Fi settings and try again.
Addressing Camera Not Connecting to Wi-Fi on the Ring Doorbell or Camera
When the Ring camera seems not to connect to the new Wi-Fi network in order to connect, check the camera’s positioning. Ensure that the settings on your Ring doorbell camera is within the Wi-Fi’s range, and there aren’t any major obstacles that can obstruct the signal.
Moreover, verify if the Wi-Fi network security protocol is compatible with the camera. In cases where your network is set to WEP, consider changing it to WPA or WPA2, since the latter are more secure and widely supported.
Handling the Case of New Wi-Fi Network on Your Ring Not Showing Up on Device List
If the new Wi-Fi network does not appear in the list of networks on your device, it could be due to the Wi-Fi being set as a hidden network. In this case, you would need to manually enter the Wi-Fi name and password.
Also, remember that Ring cameras only connect to 2.4 GHz network Wi-Fi frequency. If your new network operates on a 5GHz frequency, it will not show up on your device list. You’ll need to adjust your router settings to broadcast on a 2.4GHz frequency as well.
By attempting these troubleshooting techniques, you should be able to solve most common hitches associated with changing the Wi-Fi on your Ring camera.
Enhancing Your Internet Connection for Optimal Performance of Your Ring Doorbell from the mounting bracket
It is essential to have an optimized Wi-Fi network to get the most from your Ring security camera. A dependable and strong wireless connection ensures that your Ring camera operates efficiently and provides high-quality surveillance. This guide discusses ways in which you can enhance your Wi-Fi network for the best performance of your Ring camera.
Assess and improve Change the Wi-Fi Network
Positioning your router strategically is crucial in ensuring your Ring camera has a strong Wi-Fi signal. If your Ring camera is too far from your router or if there are obstacles such as walls, metal objects or devices emitting radio waves between them, the Wi-Fi signal may be weakened. Moving your router, removing obstacles, or even using enter your Wi-Fi password can significantly improve the signal strength.
Regularly updating your router’s software can help strengthen the Wi-Fi signals. Manufacturers often release updates that enhance performance and resolve connectivity issues. Additionally, modern routers allow you to prioritize certain devices, ensuring your Ring camera receives a consistent and uninterrupted signal, a feature you should take advantage of.
Adjust the bandwidth settings
Manage other devices on your Wi-Fi network. Multiple devices on the same network can slow down the connection. You can either disconnect unnecessary devices or setup a dedicated network for your Ring camera.
Remember, your Ring camera will need a certain amount of bandwidth to operate effectively. Ensure to check the manufacturer’s minimum bandwidth requirements and compare it with your available bandwidth. If it’s not sufficient, consider upgrading your internet package.
Choose the right change the Wi-Fi channel
Your router can transmit Wi-Fi signals on different channels. A congested channel could slow down your Wi-Fi, leading to poorer performance on your Ring camera. Changing to a less congested channel could increase your Wi-Fi speed and improve camera performance. There are multiple apps available that can assist in identifying the least congested channels.
Optimizing Your Ring Camera Performance with Wi-Fi Password Before This Step Range Extenders
Securing optimal performance from your Ring Camera can sometimes boil down to ensuring it has a robust Wi-Fi connection. At times, the signal strength can be weak due to physical obstructions, distance from the router, or even interference from other devices. To overcome such issues, Wi-Fi extenders can be valuable tools.
Before diving into the step-by-step process for configuring your WiFi 30mp wildlife hunting camera, it’s crucial to understand what they do. A Wi-Fi extender essentially amplifies the existing Wi-Fi signal, extending its coverage and providing improved signal strength to remote areas.
Achieving better results with your Ring Camera starts with the strategic placement of your Wi-Fi extender. It needs to be placed within the existing Wi-Fi signal’s radius but closer to your Ring Camera. This will allow the extender to amplify the Wi-Fi signal and extend it to your camera.
Configuring Change the Wi-Fi Extend for Improved Ring Camera Functionality
- Firstly, connect your WiFi network on a ring to a power source and switch it on.
- Press the WPS button on your extender and wait for the indicator light to blink.
- Press the WPS button on your Wi-Fi router within 2 minutes of pressing it on the extender. This creates a secure connection between the two devices.
- Check whether the indicator lights on both the router and the extender stop flashing. A steady light symbolizes a successful connection.
- Finally, ensure that your Ring Camera connects to the Wi-Fi network extended by the Wi-Fi extender. This might require you to reconnect your Ring Camera to the new network. This depends on the specific settings of your device.
By following these steps, your Wi-Fi signal should now cover a larger area, providing your Ring Camera with the continuous and strong connection it needs. As a result, you’ll experience improved video quality and fewer interruptions in your service.
Remember, every setup is unique. Some may require additional extenders or alternative solutions like powerline adaptors. Ultimately, optimizing your Ring Camera performance is about ensuring a sturdy and reliable connection to your Wi-Fi network.
Frequently Asked Questions Regarding Switching Change the Wi-Fi Wi-Fi Networks on Ring Cameras
While trying to modify want to change the able to change the Wi-Fi settings of your Ring security cameras, you may have various queries. We have attempted to address some common questions you might have during this process.
Why would I need to modify my Wi-Fi network on my Ring camera?
There could be several reasons why you might need to shift your Ring Camera to a different Wi-Fi network. The most common reasons include changing your Internet Service Provider, upgrading your router, or moving to a new place.
Will shifting Wi-Fi networks on my Ring Camera affect its settings?
Changing the Wi-Fi network on your Ring products shouldn’t affect the existing settings. However, it will require you to reset your camera and set up the new Wi-Fi network.
What information do I need to change the New WiFi Network on my Ring Camera?
You need the name of your new Wi-Fi network and the password. Ensure to disable VPNs or other network security tools during the process for smooth setup.
Can I connect my Ring Camera to multiple Need to Change the WiFi networks at the same time?
No, a Ring Camera can only be connected to a single Wi-Fi network at any given time.
Will there be any downtime during the transition to a new network?
A brief downtime is expected. As the system needs to be reset and connected to the new network, your Ring Camera may not function normally during this period. Wildlife hunting camera with 940nm
Key Points to Keep in Mind When Modifying Wi-Fi Settings for Your Ring Security Camera
Before making any changes to your Ring security camera’s Wi-Fi connection, it’s important to take certain factors into account to ensure a smooth transition and optimal operating conditions. This includes considerations for signal strength, security type and device compatibility.
Signal Strength and Network Traffic
Signal strength and network traffic can greatly affect the performance of your Ring camera. Make sure that your camera is within adequate range of the router to maintain a strong connection. Avoid connecting your camera to public Wi-Fi networks or networks that have high traffic as it can lead to intermittent connection issues or video streaming problems.
Network Security type
The security type utilized by your Wi-Fi network is another consideration. Ensure you know what type of security your network is using, such change your wifi network as WPA2 or WEP. The Ring camera supports certain security types and not supporting others may cause compatibility issues.
Multiple Devices
If you have multiple Ring devices installed around your property, it’s essential to remember that changing the Wi-Fi on one device doesn’t automatically update the settings on all other devices. Each Ring device must be updated individually.
Password Changes
Lastly, make sure you remember to update the Wi-Fi password on your Ring device whenever you change it on your router. Failure to do so could lead to your Ring camera being unable to connect to the internet, rendering it incapable of sending alerts or recording footage.
Maintaining the Security of Your Wi-Fi Connection with Your Surveillance System
Protecting the security of your Wi-Fi connection when using a surveillance system is vital. Your cam may be your primary defense against home invasions and break-ins, but if it is not securely connected to your Wi-Fi network, it can become a point of access for hackers. Here are some ways to make sure your surveillance system’s Wi-Fi connection remains secure.
Based on our experience in setting up and maintaining surveillance systems, ensuring the security of your Wi-Fi connection is paramount. Our research showed that using strong, unique passwords and regularly updating your network’s firmware are critical steps in protecting your system from unauthorized access. Additionally, enabling network encryption and regularly monitoring network activity can significantly enhance the overall security of your surveillance system.
Change your Wi-Fi Password Regularly
Regularly updating your Wi-Fi password is one of the most efficient ways to maintain the security of your Wi-Fi connection. This simple step ensures that even if someone manages to learn your password, they will not be able to access the network for long. Remember to choose a strong password that cannot be easily guessed.
Enable Network Encryption
Another effective way to secure your Wi-Fi connection is by turning on network encryption. WPA or WPA2 encryption is recommended as these are the most secure encryption methods currently available. right side of the doorbell. Encryption scrambles the information sent over the network making it incomprehensible to anyone who tries to intercept it.
Regularly Update Your Router’s Firmware
Regular firmware updates not only bring in new features and improvements but also patch vulnerabilities that could be exploited by attackers. Make sure to install these updates as soon as they are available to keep your network’s security level high.
Use MAC Address Filtering
Every device that can connect to Wi-Fi has a unique MAC address. Use MAC filtering feature to create a list of devices that are allowed to connect to your network. This will prevent unknown devices from accessing your network, even if they have your password.
- Change your Wi-Fi password regularly
- Enable Network Encryption
- Regularly Update Your Router’s Firmware
- Use MAC Address Filtering
All these measures significantly increase the security of your Wi-Fi when using surveillance devices such as a camera. Remember that safeguarding your network is as important as securing your home.
FAQ: How to change wi-fi on ring camera
How do I open the Ring app to connect my Ring device to my home Wi-Fi network?
To open the Ring app and connect your device to your home Wi-Fi network, first download and install the Ring app on your smartphone. Once installed, open the app and follow the on-screen instructions to connect your Ring device to your home Wi-Fi network.
What steps should I take to connect my Ring camera to a different network on my Ring app?
To connect your Ring camera to a different network in your Ring app, first open the app and select the device you want to connect. Go to the device’s settings and choose the network option. Follow the instructions to connect your Ring camera to the new home Wi-Fi network you desire.
How do I connect my Ring doorbell to my home WiFi?
To connect your Ring doorbell to your home WiFi, open the Ring app and select the doorbell you want to connect. Go to the ‘Device Health’ option, choose ‘Change Wi-Fi Network,’ and follow the on-screen instructions to connect your Ring doorbell to your home WiFi network.
Can I remove the doorbell to connect my Ring Doorbell to a new Wi-Fi network?
Yes, you may need to remove the doorbell from its mount to access the setup button. Press this button to put your Ring Doorbell in setup mode, then follow the instructions in the Ring app to connect it to a new Wi-Fi network.
How do I get my Ring device connected to my home Wi-Fi network?
To get your Ring device connected to your home Wi-Fi network, open the Ring app, select your device, and choose ‘Device Health.’ From there, tap on ‘Change Wi-Fi Network’ or ‘Reconnect to Wi-Fi’ and follow the on-screen instructions to connect the device to your Wi-Fi.
I have a 4K WiFi 30MP Wildlife Hunting Camera with 940nm Infrared LED; how do I ensure it’s connected to my home network?
To ensure your 4K WiFi 30MP Wildlife Hunting Camera with 940nm Infrared LED is connected to your home network, refer to the camera’s manual for specific instructions. Usually, you’ll need to access the camera’s settings through its app or control panel and select your home Wi-Fi network to establish a connection.
What should I note if I change the Wi-Fi on my Ring doorbell and other Ring devices?
Note that if you change the Wi-Fi on your Ring doorbell and other Ring devices, you will need to update each device with the new network information. This involves putting each device into setup mode and following the instructions in the Ring app to connect to the new Wi-Fi network.
Why is it important to keep your Ring device connected to the correct network?
It is important to keep your Ring device connected to the correct network to ensure uninterrupted service and functionality. A stable connection to the right Wi-Fi network ensures that your device can send alerts, stream live video, and update its software as needed.
How can I improve the Wi-Fi signal to my Ring device?
To improve the Wi-Fi signal to your Ring device, ensure your router is centrally located and free from obstructions. You can also use a Wi-Fi extender or a Ring Chime Pro to boost the signal strength to your Ring device, especially if it’s located far from the router.
What are the steps to connect a Ring device to your Wi-Fi for the first time?
To connect a Ring device to your Wi-Fi for the first time, open the Ring app and create an account or log in. Select ‘Set Up a Device’ and follow the instructions to connect the Ring device to your Wi-Fi network, which includes selecting your Wi-Fi network and entering the password.
How can I check which network is currently used to connect the Ring camera and change it if necessary?
To check the network on your ring camera, open the Ring app and select the specific camera you want to check. Go to ‘Device Health,’ where you will find information about the Wi-Fi network to which the camera is connected. If you need to change the network, click on ‘Change Wi-Fi Network’ or ‘Reconnect to Wi-Fi’ in the same section and follow the on-screen prompts to connect to a new network. Ensure you have the Wi-Fi password handy for the new network you wish to connect to.