Acquiring a surveillance system like an external Blink Camera is an essential step towards enhancing your home security. However, it can be slightly challenging to configure the device if you are new to it. This guide is designed to make the entire process more manageable and simple for you. Over the course of this guide, we will break down every essential step to get your external Blink camera up and running.
Setting up an external Blink camera requires careful handling of equipment and a basic understanding of how to navigate the device’s software. This guide gives in-depth instructions that will help you in initiating the process smoothly and efficiently.
Remember: Properly implemented, a Blink Outdoor Camera can provide the needed security cover for your home or office premises. Every step you will cover in this guide contributes significantly to the effectiveness of the device. Follow through diligently, understand every step, and you are on your way to maximize your security leverage.
If you’re looking to meticulously unbox and activate your Blink Camera outdoor gadget, then let’s embark on this security-boosting journey together.
Grasping the Capabilities of Your Outdoor Blink Camera
A comprehensive understanding of the Blink Outdoor Camera’s functionalities is crucial in using the device to its utmost abilities. It is a robust surveillance tool designed to deliver clear footage. It is equipped with impressive specs that make it a reliable security solution for your outdoor spaces.
A Closer Look at the Blink Outdoor Camera’s Capabilities
The Blink Outdoor Camera boasts a plethora of features that ensure you capture everything you need. Below are some of its standout functionalities:
- High Definition Video Quality: The camera captures footage in 1080p resolution, offering a clear and detailed view of your surroundings, thus ensuring nothing significant is missed.
- Advanced Motion Detection: Upon detecting any suspicious movement within its field of vision, the camera sends an instant alert to your connected device. This allows you to promptly check the situation and take necessary actions.
- Two-way Audio: This feature facilitates conversations or warnings to be made directly from your connected device to the camera, helping to deter possible intruders.
- Night Vision: Its night vision capability ensures 24/7 surveillance by delivering high quality video even at night or in low light conditions.
- Weather-resistant: The camera is designed to withstand various weather conditions, promising uninterrupted surveillance regardless of rain, heat, or snow.
Mastering the extensive capabilities of your outdoor Blink camera ensures effective utilization of your device for optimum home security. From its high-quality video capture to its advanced motion detection, this comprehensive device serves as an excellent deterrent and recording device for any potential security threats.
Preparation of Essential Equipment for Blink Outdoor Camera Installation
Before you can begin the process of setting up your Blink Outdoor Camera, it’s critical to gather all the necessary tools to ensure the procedure is as smooth as possible. Here’s a step-by-step guide on the tools you require and how they’ll be utilized:
A. Primary Tools
1. The Blink Outdoor Camera kit: This package includes everything you need to install your Blink camera, including the camera itself, mounting brackets, and screws. Make sure you have the full kit before starting the installation process.
2. A smartphone with the Blink app installed: You’ll need a smartphone to set up the camera. The application is available on both iOS and Android platforms. Ensure your smartphone is fully charged before beginning the setup to avoid interruptions.
B. Additional Accessories
- Screwdriver: The kit typically includes screws, but it doesn’t always provide a screwdriver. It’s advisable to have a small Phillips screwdriver on hand for the installation.
- Drill: If you plan on mounting the camera on a hard surface like brick or concrete, you will need a drill. Be sure to use an appropriate drill bit size.
- Level tool: To ensure the camera is even and provides the view you desire, a level tool can be a useful piece of equipment. This tool isn’t mandatory but can make a difference in positioning.
Once you gather all the necessary equipment, you can proceed to the primary task of setting up your Blink Outdoor Camera efficiently and without any hindrances. Remember to follow all safety guidelines while using the tools to avoid any mishaps.
Guide on How to Efficiently and Securely Power Down Your Outdoor Surveillance Camera by Blink
Shutting down your outdoor Blink surveillance camera system should be carried out carefully. Here are the steps to follow for a safe power down:
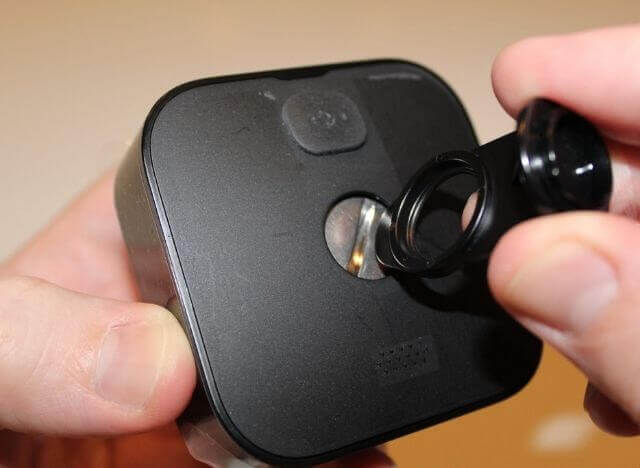
Stage 1: Open the Camera
Firstly, ensure your hands are dry to avoid any possible electrical harm. Carefully remove the back cover of your Blink Outdoor Camera. Normally, there will be a push tab to press while sliding off the back cover.
Stage 2: Power Source Deactivation
Once you have the back cover off, you will see the batteries or power source. Remove the batteries if they are still in good condition. If your Blink camera is hardwired, remove it from the power outlet. This is a crucial step toward safely shutting down your camera.
Stage 3: Disconnecting the System
Use the Blink Home Monitor app on your mobile device. Scroll to the system you aim to disconnect, then click on settings. Select ‘Delete System’ from the options presented, being sure to confirm your choice.
Stage 4: Resetting the Camera
On the physical camera, locate the reset button below the camera lens and push it. Be aware this will delete all data and return your camera to factory settings.
Stage 5: Closing Up
Once you have successfully powered down your Blink Outdoor Camera, it’s important to place the back cover back on to protect the device from dirt or water damage. Use the push tabs to securely attach the camera back together.
Remember: Always take precautions when handling electrical devices. It’s advisable to consult the user’s manual or seek professional help if you’re unsure of any steps.
Procedure for Detaching the Mounting Bracket of an Outdoor Blink Camera
Even though the installation of an outdoor camera from Blink is relatively easy, the task of detaching its mounting bracket may seem challenging. In order to ensure the proper removal without causing any damage, special attention and care should be taken. Below you’ll find detailed instructions on how to seamlessly dismount the camera holder.
Steps to Detach your Blink Camera’s Mounting Bracket
- Switch off the camera: Ensure that the Blink Outdoor Camera is turned off before you start the process. This can prevent any electrical mishap.
- Unscrew the camera from the mount: Carefully locate the base of the mounting bracket and unscrew the camera. It is advised to hold the camera tightly while doing so to prevent it from falling.
- Remove the screws from the bracket: The bracket is typically secured to the wall with two or three screws. Use a suitable screwdriver to remove these screws. It’s wise to keep these screws in a safe place if you plan to reuse the bracket in the future.
- Retrieving the bracket: With the screws detached, you can now safely remove the mount from the wall.
Please note: Always remember to be cautious when removing the mounting bracket as forceful or abrupt movements could potentially damage the bracket, the wall or even the camera.
In instances where the mounting bracket is exceptionally difficult to detach, it might be a viable option to seek professional help to prevent any accidental damage.
Procedure to Locate and Access the Battery Section of Your Blink Outdoor Camera
The power source of your Blink outdoor camera is its battery. Thus, accessing and knowing how to operate the battery compartment is essential. Even though the procedure for locating and opening the battery compartment of a Blink outdoor camera varies slightly depending upon the camera model, most follow a similar process.
Detecting the Battery Compartment
The battery compartment for the Blink Outdoor camera is typically located at the backside of the camera. It is generally concealed to enhance the aesthetics of the camera while ensuring that it remains waterproof. The compartment is usually marked by the presence of a small latch, slide, or a screw-depending on the specific camera model.
Accessing the Battery Section
Opening the battery compartment often involves pushing the latch or sliding it open to access the battery section. Some models of the Blink outdoor camera may require the use of a screwdriver to unfasten a tiny screw that keeps the compartment secured. Ensure to keep all the screws safely while opening the compartment as losing them may affect the camera’s water-resistant property.
- Remove the Camera from its mount: Before trying to open the battery compartment, make sure to gently detach the camera from its mount.
- Locate the Battery Section: Once the Blink camera is successfully removed from its mounting bracket, locate the battery section usually found on the backside of the camera.
- Open the Compartment: After identifying the compartment, open it cautiously. If opening requires unscrewing, use a compatible screwdriver to do so. Remember to keep the screws safe while working on them.
Once the battery compartment is open you will be able to replace the batteries, if necessary. Remember to close the compartment securely to preserve the camera’s waterproof feature and then remount the camera to its initial position.
How to Change the Batteries in Your Outdoor Blink Camera
Ensuring your Outdoor blink camera is always powered is essential for continuous monitoring and security. Here is a detailed guide on swapping out your camera’s batteries.
Step One: Opening the Battery Compartment
For most outdoor Blink camera models, the battery compartment can be found at the back of the device. Use a screwdriver to gently unscrew the battery cap to access the inside chamber. Remember to keep the screws in a safe place, as you will need them to secure the cover back in place.
Step Two: Removing the Old Batteries
Before you proceed with removing the old batteries, ensure that the camera is off to avoid any potential electronic hazard. Carefully take out the old batteries and recycle them according to your local laws and guidelines.
Step Three: Inserting the New Batteries
Upon purchasing new batteries, ensure they are of the same type as the one previously used in your Blink Outdoor camera. Never mix different types or brands of batteries as this could cause damage. Insert the new batteries in the same position as the previous ones. The battery orientation is typically indicated in the compartment.
Step Four: Closing the Battery Compartment
After successfully installing the new batteries, it’s time to close the compartment. Screw the cover back on using the screws you set aside earlier. Ensure the cover is tightly secured to protect the batteries from outer elements.
Step Five: Testing the Camera
Turn your camera back on to test its operation with the new batteries. If the camera doesn’t come on, double-check to ensure that the batteries have been inserted in their proper orientation and the compartment is securely closed.
Insider tip: Always keep spare batteries at hand to ensure uninterrupted power supply and swift battery replacement for your Blink Outdoor camera.
Advice for Cleaning the Inner Parts of Your Weatherproof Surveillance Gadget
Your weatherproof surveillance gadget is your eye in the outdoors, constantly keeping watch for you. It’s important to maintain its cleanliness, especially the internal parts, to ensure optimum functionality.
Cleaning Tips
When it comes to cleansing, safety is paramount. Prior to commencing the cleaning process, ensure to switch off and disconnect your security device. This will safeguard you from potential electrical shocks and also protect the camera and its components.
Do not spray liquid directly on the gadget. A gentle wiping action with a dust cloth should suffice. Moisture has a damaging effect on electronics, hence this precaution.
Avoid the usage of abrasive materials or substances for the cleansing process. Utilize a can of compressed air to gently blow out dust and grime from those concealed corners of your camera equipment.
- Compressed Air:Compressed air is highly effective in cleaning the nooks and crannies of your exterior surveillance tool. It can dislodge stubborn dirt particles which are unreachable by any cleaning cloth.
- Microfiber Cloth: A microfiber cloth can be beneficial in cleaning the electronic components of your gadget. As they are gentle and lint-free, they will not scratch or leave residues on the surfaces.
- Alcohol-based Cleaning Substances: These solutions are excellent for cleaning glass surfaces on your camera and can also remove sticky residues. However, beware not to apply them directly to any plastic or rubber parts.
Your outdoor camera works hard to keep your home secure. Ensuring the inner components are clean and dust-free can add years to its life and improve the quality of footage it produces.
Always remember to read and follow the manufacturer’s cleaning guidelines. Not all tools are suitable for each type of camera and improper cleaning can cause damage. All cleaning methods mentioned above should be implemented gently and carefully.
Reassembling Your Outdoor Security Camera from Blink
After gaining insight on how to open your outdoor intrusion detection camera from Blink, the journey doesn’t end there. You also need to understand how to return it to its original form when you’re done. Here’s a simple guide.
Pieces and Parts Check
Before diving into the reassembling process, it’s important to review all the pieces and components. Ensure nothing is missing or damaged. Keep all the necessary hardware handy to avoid interruptions during the assembly process.
Reinstating the Batteries and Front Cover
Start by placing the batteries back in their compartment, ensuring that they are correctly positioned according to the indicated polarity. After the batteries are in place, you can now return the front cover. Align it carefully with the grooves and gently press until it clicks into place.
Securing the Back Panel
With the front cover in place, move to the rear of the camera, and hold the back panel in position. Make sure the notches align with the corresponding holes on the camera. You can then proceed to fasten it with the screws provided.
- Screws: The number of screws will depend on your specific model, but typically two to four screws are needed. Ensure they are tightened adequately but avoid over-tightening as this could strip the threads or crack the casing.
- Screwdriver: Use the screwdriver that came with your device. If you lost it, any other small Philips head screwdriver should work fine.
Reattachment to the Mounting Bracket
After the camera is in one piece again, the final step is to attach it back onto its mount. Ensure to position the camera lens in the direction you want to monitor and carefully tighten the adjustable wheel or screw on the mount.
Now, your reassembled outdoor surveillance camera from Blink should be up and running again, working tirelessly to monitor and secure your property.
Getting Your Blink Outdoor Cam Up and Running After Unboxing
Once you’ve unpacked your Blink Outdoor Cam, it’s time to power it up and test it to ensure it’s working as it should be. To do so, you’ll need to follow a few simple steps.
Activating Your Outdoor Cam
The first step is to turn on your device. Insert the batteries, coming with your Blink Outdoor Cam, into the battery slot, ensuring that they are oriented correctly. Look out for the battery direction markers inside the compartment.
Conducting a Test Run of Your Blink Outdoor Cam
After you’ve successfully powered up your device, it’s essential to conduct a test run. This will help you assess if your Blink Outdoor Cam is functioning correctly before mounting it outdoors.
- From your smartphone, download and install the Blink Home Monitor App, available both on Android and iOS.
- Open the app and follow the on-screen prompts to set up a new system or add a device to an existing system.
- When asked, scan the QR code located at the back of your camera.
- On successful connection, click on the live view option to commence the camera feed.
Note: If the quality of the live feed and the device’s response rate are satisfactory, it indicates that your Blink Outdoor Cam is working well.
If you encounter any issues with these steps, it’s best to review the user manual or contact Blink’s customer support for further assistance.
What to Do When Your External Security Camera Is Not Functioning Post Setup
Cheking Power Source and Connectivity
If the external surveillance device is not functioning after installation, the first thing to consider is the power source. Check if the device is properly plugged in and switched on. For a battery-operated camera, it is important to check if the batteries are correctly installed and not drained.
Next, verify your internet connectivity. Wi-Fi strength can significantly impact the functioning of your camera. Make sure your device is within the effective range of your router. Sometimes, resetting the router can also help to resolve any network-oriented issues.
Software Updates and Resetting
Software updates often come with bug fixes and improvements which can resolve issues with device functionality. Visit the camera’s manufacturer’s site or application and check if there’s an update available.
If the problem persists, you might want to restart the device. This can sometimes resolve minor bugs or glitches. If a simple restart doesn’t help, you may move to a more drastic measure: a factory reset. Be aware this will erase all your settings and return the device to its original state.
Contacting Customer Support
If all else fails, do not hesitate to reach out to customer support for your product. Be prepared to provide details about the issues you are facing and all the troubleshooting steps you have already tried.
- Ensure the issue is not power or connectivity related
- Check for software updates
- Restart or reset the device
- Contact customer support if needed
Following these steps increases the probability of seamlessly restoring the functionality of your surveillance device, keeping your premises secure once again.
FAQ: How to open blink outdoor camera
What should I do if my Blink Outdoor Camera is not turning on?
Ensure that the camera is properly powered. Check the batteries and replace them if needed. If it is powered and still not turning on, try resetting the camera.
What should I do if the camera is not recording videos?
Make sure the camera is set to arm mode. Also, check your account’s cloud storage space. If it’s full, you need to delete some videos to make room for new ones.
Why am I getting a poor video quality?
Check the location of your camera. If it’s too far from the wifi router, the signal may be weak, which can affect video quality. Also, clean the camera lens to ensure there are no dirt or smudges that can blur the video.
What should I do if my camera is not detecting motion?
Check the camera’s motion sensitivity settings and increase it if needed. Also, ensure that the camera’s view is not blocked by any obstacles.
Why is my camera not syncing with the Blink app?
Make sure your phone is connected to the Internet. Close and reopen the app or try uninstalling and reinstalling it. If it still doesn’t work, check if there are any updates for the app.
What should I do if the camera’s night vision doesn’t work?
Ensure that the infrared lights on the camera are clean and unobstructed. Also, verify that the ‘night vision’ setting is turned on in the camera’s settings.
Why can’t I hear any sound in the videos?
Check your camera’s audio settings. Make sure the microphone is not muted and the volume is turned up.
Why does my camera keep disconnecting?
Check your wifi signal. If it’s weak, try moving your camera closer to the router. If it’s still disconnecting, try resetting your router or contact your Internet Service Provider.
What should I do if my Blink Outdoor camera doesn’t work right after opening the package?
There are several actions you can take if your Blink Outdoor camera isn’t working immediately after opening it. Firstly, make sure the device is fully charged and correctly connected to your home network. Secondly, ensure the app is up-to-date and your device is compatible. If the problem persists, try resetting the device or contacting Blink’s customer support for further assistance.
How to troubleshoot when my Blink Outdoor Camera fails to connect to the Wi-Fi network?
If your Blink Outdoor Camera fails to connect to the Wi-Fi network, several issues could be the root cause. Firstly, check that your Wi-Fi router is working and that you have a strong internet connection. Additionally, make sure that your camera is within range of your Wi-Fi signal, and that you’ve entered the correct Wi-Fi credentials into the Blink app. If the problem persists, you may want to try repositioning the router or the camera or even resetting the camera to factory settings.