In today’s world, ensuring the safety of our homes and securing our properties have become paramount. Home security camera systems are increasingly becoming a pivotal part of home security. The Blink camera system is a popular choice due to its advanced features and ease of assembly. Yet, some users might still find the installation process daunting. This article aims to simplify these steps and make the task hassle-free for you.
We have put together an exhaustive, easy-to-understand guide that would help you navigate the process of setting up your Blink Security Camera from scratch. It doesn’t matter if you’re a tech novice or a seasoned professional, this comprehensive guide has information for everybody, delivered in a highly digestible manner.
The primary focus is on Blink cameras – state-of-the-art security cameras designed for simplicity and efficiency. Whether you need a security camera around your house premises or inside your abode, Blink cameras are worthy contenders. But, like any piece of technology, it requires careful installation for optimal performance.
Make sure to go through each step minutely to ensure successful installation. Read on to demystify the mounting process of these modern security marvels.
Why Security Camera Systems Are Crucial for Security
Diving deep into the importance of home security, one must understand the significance of security surveillance cameras, often a fundamental part of any comprehensive home protection plan. The benefits of video surveillance, though often underestimated, are profound and many.
First and foremost, the fundamental role security camera systems play is deterring criminal activity. A mere sight of surveillance cameras can often ward off wrongdoers, as the risk of getting caught red-handed increases dramatically. The potential criminals might rethink their intentions, making your home an undesirable target.
Peace of mind is yet another advantage offered by security cameras. The knowledge that these eyes are constantly monitoring your home relieves you from perpetual worry about the safety of your belongings and more importantly, your loved ones. Surveillance cameras provide reassurance that an objective record of events is being continuously created and can be referred to in case of suspicious incidents.
Other Crucial Benefits of Security Cameras
- Proof of Crime: Security camera footage serves as objective evidence in case of a crime. This documented proof can aid in settling disputes or validating incidents for legal and insurance purposes.
- Always keep an eye on children and elderly: Indoor cameras can also act as a virtual baby monitor or elder care device. It allows parents to keep a tab on their children or elders when they are not physically around.
- Maintain Records: Modern security cameras can store days, or even weeks, of footage. Not only can this footage serve as a record of events, but also help in identifying patterns that might prevent future crimes.
In conclusion, understanding the importance of security camera measures is a significant step towards implementing an effective home security plan. These cameras serve as silent guards, offering protection, peace of mind, and definitive proof in case of unpleasant incidents.
Selecting The Best Spot for Your Blink Security Surveillance Equipment
Positioning your Blink security surveillance system efficiently is essential to maximize its utility. Incorrect placement can lead to incomplete coverage, leaving some areas of your home susceptible. Here’s how to choose the ideal location.
Consider the Field of View
The first step in choosing the right location for your security system is to consider the camera’s field of view. This requires knowledge of the area or room that needs to be surveilled. For instance, installing it in a corner provides a broader view.
It would also help to mount it at an appropriate height. Blink security cameras should generally be installed about 7-10 feet from the ground. The higher the camera, the more area it covers. However, it is important to prevent unnecessary sky in view since it could trigger false alarms, especially in outdoor cameras.
Lighting Conditions
Lighting conditions can significantly impact the quality of video feed. Therefore, do not install your Blink camera near light sources or against a window, since these might wash out the image.
On the other hand, a poorly lit area will result in dark footage. Hence, it is essential to strike a balance. If installing outdoors, check how sunlight changes throughout the day to determine the best possible location.
Other Factors
Always consider privacy concerns. Ensure the camera view does not invade your neighbor’s property or any private rooms in your home.
Moreover, remember that Blink cameras also detect motion. Therefore, avoid areas where pets can trigger false alarms or places with regular movements like near window curtains or trees.
Remember, a well-placed Blink security camera can provide the peace of mind you desire to keep your home safe. Always plan ahead to utilize its features maximally.
Unpacking and Getting Familiar With Your Blink Security Camera Kit
Once you’ve received your Blink Security Camera kit, the first step is to carefully unbox it and familiarise yourself with its contents. Each kit typically includes a Blink camera, mount, AA lithium batteries, a power adapter, and an installation guide. Understanding what each component is for will help ease the installation process.
Camera: This is the most essential part of your kit. The Blink camera is a wireless, high-definition device, equipped with motion detection and two-way audio. It is used to capture videos and send alerts to your smartphone.
Mount: The mount included in the kit is used to affix the camera in your chosen installation spot. The mount’s design allows for easy adjustment of the camera’s viewing angle to ensure optimal coverage.
Batteries: The Blink camera is powered by two AA lithium batteries. On average, these batteries can last for two years, which eliminates the need for frequent battery replacement.
Power Adapter: This adapter is used to power the Blink system. Ensure you have a power outlet nearby your intended camera location.
Installation Guide: This guide provides step-by-step instructions on how to install your Blink camera.
Getting Started with Your New Blink Security Camera
After identifying the kit components, it’s time to start setting up your Blink security system. Before installing the camera, it’s advisable to connect and configure it first. Ensure to download and install the Blink Home Monitor App on your phone. Register and create an account in the app, then follow the instructions to add your Blink camera. After successful connection, check the live view feature to confirm the camera’s functionality.
Decide where to install your camera, considering crucial factors such as Wi-Fi signal strength and targeted viewing area. Remember to install it in a place which offers the best vantage point for security purposes. Then, place the mount and secure the camera in its position. Lastly, verify the camera’s view on the app to ensure you’re satisfied with the placement.
After going through this process of understanding the components of your kit and their functionality, you are now equipped to fully set up and optimise your Blink security camera for your home’s safety.
Essential Equipment for Setting Up Blink Security Cameras
Before embarking on the installation of Blink Security Cameras, it is vital to gather all the necessary tools and materials to make the process smooth and efficient. This list includes:
- Screwdriver: A screwdriver is a crucial tool for any installation process. It helps with mounting the camera on walls or ceilings, depending on your home or office layout.
- Camera Mounts: An essential component for installing Blink Security Cameras is the camera mounts. They provide sturdy support to the camera, assuring firm and steady footage capturing.
- Mounting Screws: These are used to secure the camera mounts to the surfaces. Depending on the surface where you want to install the camera, you may need different types of screws.
- Drill and Drill Bits: If you’re planning on installing your camera on a hard surface, a drill will be quintessential. Ensure you have drill bits of the correct size for the screws you’re using.
- Level: Use a level to ensure the camera is straight. This ensures the images and video captured will not be at an angle, providing the best possible view.
- Batteries: Finally, don’t forget the batteries for your Blink Security Cameras. This type of camera is battery-powered, so ensuring you have high-quality batteries is a must.
The above materials and tools are the primary requirements to ensure a thorough, clean, and successful install. But, always remember to review the manufacturer’s instruction manual for a detailed step-by-step guide on mounting your Blink Security Cameras correctly.
Comprehensive Instructions on Setting Up the Attachment Platform for your Blink Safety Device
An important aspect to ensure optimal functioning of your Blink security system is correctly installing the mounting bracket. The following detailed guide takes you through every step of installing the attachment platform for your Blink camera.
Materials Required
- Blink camera
- Mounting bracket
- Phillips-head screwdriver
- Drill and appropriate sized drill bit (optional)
Procedure of Installing the Bracket
Start by identifying a secure and advantageous location for your camera. It should be a location that offers a comprehensive field of view, while also being unreachable for potential intruders.
Once you have chosen the location, hold the mounting bracket against the surface and use a pencil to mark drill holes. Keep the bracket aside and, if necessary, use a drill to make the holes.
Place the bracket back on the marked surface and use the screws provided to secure it. Ensure that the bracket is tightly screwed into the surface and doesn’t wobble when shaken. This will ensure a stable and secure foundation for your camera.
Finally, take your Blink camera and align it with the mounting bracket. Carefully, screw in your camera onto the bracket ensuring it’s secure and stable. Once done, adjust it to cover the desired field of view.
Following the above guide should help you securely install the the Blink camera mounting bracket. Remember to routinely check the stability of the mount to ensure ongoing security.
Final Thoughts
Proper installation of the mounting bracket for your Blink security device is crucial in making the most of your home security system. By following this step-by-step guide, you can ensure that your system is effectively monitoring your property and keeping you and your loved ones safe.
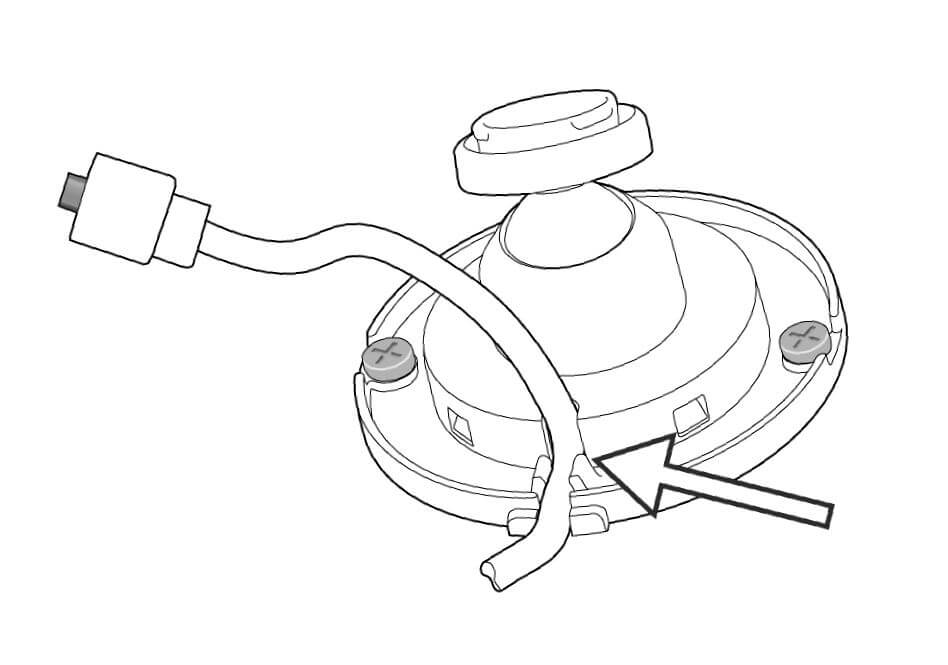
Procedure to Fasten the Blink Security System Camera to the Mount
You need to safely and securely mount your Blink security camera onto the mounting bracket to ensure optimal surveillance and functionality. The process is straightforward and requires minimal technical knowledge or experience.
1. Initial preparations
For starters, locate the desired installation area. Ensure the position allows for a clear view and is away from direct exposure to intense weather conditions. Also, clear the specific area of any obstacles or dust.
2. Setting up the mounting bracket
Proceed to position the mounting bracket precisely where you plan to place your camera. You can use a spirit level to ensure proper alignment. Once perfectly aligned, mark the screw holes using a pencil or marker.
3. Securing the bracket
Drill holes on your surface using the marked spots as a guide. Insert wall plugs if necessary and screw the bracket tightly against the surface. The objective here is making sure the Blink Surveillance Camera mounting bracket remains firm even when subjected to vibrations or wind.
4. Mounting the camera
Carefully attach the Blink Security Camera onto the bracket. Make sure you hear a click sound signifying that your camera snapped in securely. Slightly adjust the viewing angle to cover your desired area.
5. Final Settings
Finally, use the Blink app to fine tune the camera settings to your liking. Check that the camera view is as desired and the system is operating as expected. Make any necessary adjustments to the camera angle and settings.
Remember, improper installation of your security camera may hinder its performance or even cause premature damage. Therefore, it is crucial to ensure you follow the correct process when mounting it onto its bracket.
Setting Up and Synchronizing Your Blink Security Camera
Step 1: Setting Up Your Blink Security Camera
The initial configuration of your Blink Security Camera might seem a bit intimidating, but it is actually quite straightforward. By following these steps, you can quickly perform the setup process:
- First, you need to download and install the Blink Home Monitor app from either the Google Play Store for Android devices or the App Store for iOS devices.
- After the application has been installed, open it and create a new account. If you already have an account, you can simply log in using your credentials.
- In the app, tap the Add a System button. Then enter a name for your system and tap Done.
- Next, you’ll need to add the Blink Security Camera to your system. Click on the Add a Blink device button, then follow the prompts to install your camera.
Step 2: Synchronizing Your Blink Security Camera
Synchronization of your security camera to your mobile device will allow you to manage, monitor, and control the camera remotely. The setup process is quite easy, follow these steps:
- Select Add a Sync Module in the app menu.
- Input the Serial Number of the module, which can be found on the back of your module.
- Then, hit Discover Device and let the app find your Sync Module.
- Once the Sync Module is connected, choose your Wi-Fi network from the list, input the password, and confirm.
Once you’ve completed these steps, your Blink Security Camera will be ready for use.
Handy Suggestions for Modifying the Orientation of Your Blink Security Camera for the Best Surveillance
Ensuring that your Blink security camera is correctly angled is vital to achieving comprehensive surveillance. The effectiveness of your security system largely depends on the coverage of your cameras, so proper alignment is crucial. Here are some tips that might aid you in positioning and adjusting your security device for the most optimal coverage.
Consider the Height and Location
Determining the height and location is one of the first steps towards adjusting your camera’s angle for the best possible coverage. Consider positioning your cameras where they can capture a wide view of the premises. An elevated point that overlooks a large space may be the best place to mount your camera. However, the camera should not be placed too high as it may compromise the details in the footage. Similarly, when the camera is mounted too low, it risks being easily tampered with.
Adjust the Viewing Angle
After mounting, adjusting the viewing angle of your cameras is of utmost importance. Most cameras offer a certain range of camera tilt and pan that allows modifications after mounting. To adequately cover the area, the camera should be tilted downwards to about 30-45 degrees. Moreover, instead of a straight-on view, opt for an overlap with other cameras if possible, to avoid any blind spots.
Fine-tune the Field of View
Lastly, ensuring the field of view is comprehensive can help you make the most of your Blink camera’s features. Avoid pointing your camera too much towards the ground or sky, as it could limit its coverage area. Instead, ensure that the horizon and the ground appear in the video feed to maintain a good balance between the ground-level details and the broader view.
By implementing these tips, you should be able to get the most optimal coverage from your Blink security camera and enhance your overall surveillance system’s effectiveness. Remember, a well-placed and perfectly angled camera can make all the difference when it comes to security.
Identifying and Resolving Typical Obstacles When Installing Blink Security Cameras
In the process of setting up your Blink Security Camera, you might run into a few challenges. By understanding the common issues and their solutions, you’ll breeze through the installation process.
Tackling Issues Brought About by Unsteady Mount Positions
One problem you might encounter when trying to place your security camera could be an unstable mounting location. This issue could lead to unclear videos and images due to the motion of the camera. The root cause is often surface-related, i.e., the surface may be too slippery or uneven for a secure fit. You can troubleshoot this by ensuring the mounting surface is flat and sturdy enough to hold the weight of the camera. Using non-slide materials or reinforcing the attachment bracket can also help stabilize the camera.
Dealing with Mounting Height and Angle Problems
Another common issue has to do with the height and angle of your Blink security camera. If the camera’s view is obstructed, or if it’s set too high or too low, it may not work effectively. Check that the field of view is free from obstructions and that the camera is set at the recommended height for the model you’re using. Often, a minor adjustment makes all the difference in your camera’s recording quality and accuracy.
Resolving Connection and Sync Issues
- At times, your Blink security camera may face connection issues, and these are often related to Wi-Fi coverage. If you see that your camera keeps disconnecting, consider moving your router or getting a Wi-Fi extender to ensure a strong and stable connection.
- Sync problems, such as the system not recognizing the camera, can also be a cause of concern. In most cases, resetting the sync module by unplugging it and plugging it back in after a few minutes can resolve these issues.
Remember, a smooth and successful Blink security camera installation often depends on your preparation and patience. Paying close attention to detail and following the instructions will help you overcome the common obstacles that may arise during the installation process.
Making Sure Your Blink Security System Stays in Top Condition
Ensuring that your home security devices, like the Blink security camera, are well-maintained and checked on a regular basis is crucial to guarantee optimal performance. Here are some easy-to-follow steps to keep your Blink surveillance devices in excellent form.
Regular Monitoring and Routine Inspections
Regularly monitor the performance of your security cameras. Blink’s mobile application provides real-time access to your camera feed. Utilize this feature not just for surveillance but also to check for any evident issues related to the camera’s video quality.
Perform routine inspections of your security cameras. Dust and debris can accumulate over time, which can obstruct or blur the camera’s vision. Therefore, clean your cameras gently using a soft, dry cloth at least once every two months.
Power Source and Software Updates
Ensuring your Blink security camera’s power source is working efficiently is crucial. These cameras operate on batteries, and it is advisable to check their battery condition regularly. A weak or drained battery can disrupt the device’s functionality.
Keep your security camera’s software up to date. Blink frequently releases software updates that come with improvements and bug fixes. Regularly updating your camera’s software is one of the best ways to maximize its performance and longevity.
Maintaining Location Integrity
- Make sure your cameras are mounted securely. Check the mountings regularly to ensure they’re still firm and haven’t been tampered with.
- Consider the environmental factors your security cameras are exposed to. Outdoor cameras should be checked more often as they are exposed to weather and could be damaged by extreme conditions.
In closing, maintaining and checking your Blink security camera regularly ensures it remains in perfect working condition, providing maximum security for your property.
Boosting Safeguard Protocols with Advanced Features of Blink Cameras
Blink security cameras are designed with a plethora of innovative features that aid in escalating the effectiveness of your home or business surveillance. These features not only provide high-definition real-time monitoring but also come handy with additional measures to augment the overall safety environment.
1. Motion Detector
One key highlight of Blink security cameras is their advanced motion detection capability. As soon as any movement is perceived, the camera triggers an alert instantaneously to the connected device. This feature enables you to act quickly in case of any unanticipated activity, subsequently bolstering your security measures.
2. Two-way Audio
Another impressive feature is the two-way audio functionality. It facilitates communication with people on the other side of the camera. This comes in handy when combined with the motion detector, where you can confront the unexpected guest or intruder directly through the camera.
3. Night Vision
Blink cameras are equipped with high-definition night vision, a feature that enables seamless surveillance under insufficient lighting or at night. The infrared-based night vision turns on automatically when it gets dark, guaranteeing uninterrupted supervision all day and night.
Infrared Temperature Sensor and Waterproofing
Most models of Blink cameras come with an infrared temperature sensor. This allows the cameras to function efficiently in fluctuating climate conditions by auto-adjusting based on the temperature readings. Moreover, having a waterproof casing, these cameras can withstand rainy weather, making them an excellent fit for outdoor installations.
4. Cloud Storage
In the event of a security breach, it is crucial to have dependable backup data. Blink cameras provide cloud storage solutions that help store video footage, which can be accessed later, hence assuring reliable backup for your safety measures.
To sum up, the variety of distinctive features that come with Blink security camera units play an instrumental role in fortifying your security setup. From motion detection to night vision, two-way audio to cloud storage, every feature contributes towards creating a formidable security shield around your premises.
FAQ: How to mount blink camera
What is a Blink camera?
Blink cameras are smart home security systems developed by Amazon. They provide high-quality video footage and several features for enhancing the security of your home, such as motion detection, Live View, and even two-way audio.
What is the purpose of motion detection feature in Blink cameras?
The motion detection feature enables the camera to alert the user whenever it detects motion within its field of view. This means that you get an alert on your device whenever there is someone lurking around, ensuring you can react promptly to probable security threats.
What is the benefit of Live View feature in the Blink camera system?
The Live View feature allows the user to view real-time footage from any of the cameras installed. This means that you can remotely monitor your home using the Blink app on your smartphone, regardless of where you are.
What is the two-way audio feature about?
The two-way audio feature enables users to not only hear through the Blink camera’s microphone but also speak through its speaker. This can be particularly useful to speak to someone at your doorstep, maybe a delivery person, when you’re not at home.
Do Blink cameras provide night vision?
Yes, Blink cameras come with built-in infrared night vision. This feature allows you to monitor your home even in pitch-dark conditions, ensuring round-the-clock security.
Are Blink cameras capable of recording clips?
Yes, Blink cameras can indeed record clips. They automatically start recording once they detect motion, and these clips are stored on cloud for up to 7 days, allowing you to review the footage whenever you need.
Can more than one user access the Blink camera system?
Absolutely! You can share access to your Blink system with trusted family members and friends. This ensures more eyes on your security feed and enhanced security for your home.
Are Blink cameras waterproof?
Certain models of Blink cameras, such as Blink XT2 and Blink Outdoor, are designed to be waterproof, allowing for outdoor use despite unfavorable weather conditions.
What additional features on Blink cameras can be used to enhance security measures?
There are several additional features on Blink cameras that can enhance security measures. These include motion detection alerts that notify you when activity is detected, infrared night vision that allows clear recordings even in low-light conditions, two-way audio feature that enables you to communicate with guests or warn off intruders, and the ability to integrate with smart home systems for convenient control.
How do motion detection features in Blink cameras enhance security?
The motion detection feature in Blink cameras significantly enhances security by alerting you in real-time when movement is detected within the camera’s field of view. This means you’re immediately aware of any activity, allowing you to act quickly. Also, you can customize the sensitivity of the motion detector, ensuring that you’re only alerted to the the movements that matter to you.