In an era when home security has gained tremendous importance, smart surveillance solutions like Wyze cameras have become a go-to choice for many. These cameras, acclaimed for their top-notch features at an ultimate value, provide nonpareil comfort and security. However, changing their Wi-Fi connection may confuse some users. Whether you’ve purchased a new router, changed your internet provider, or moved to a new place, this comprehensive guide will make the task a breeze.
Your Wyze camera’s functioning depends heavily on its uninterrupted connection to a Wi-Fi network. Thus, it’s crucial to know the appropriate method to link it to a new network without any trouble. If you’re unsure of how to navigate through this process or if this is your first time trying, we’ve got your back.
This article gives you a step by step walkthrough on seamlessly establishing a new Wi-fi connection for your Wyze camera. Packed with easy-to-follow instructions and handy tips, it is designed to make this otherwise technically sounding task, simple and manageable.
Welcome! Let’s set the pace for a smooth and secure connection for your Wyze camera to a fresh Wi-Fi network.
Getting to Know why Wifi Connection is Critical for Your Wyze Security Camera
As technological advancements continue to revolutionize our day-to-day lives, understanding the importance of these advancements becomes increasingly crucial. One such game-changer is the Wyze security camera. However, to reap its full benefits, it’s imperative to know why connecting it to a wifi network is so fundamental.
Real-time Monitoring
One of the significant advantages of connecting your Wyze surveillance camera to a wifi network is real-time monitoring. By doing so, you can stream live footage directly to your smartphone or computer, no matter where you are. It can offer peace of mind, especially when you are away from home or office, as you can view the status of your property instantly.
Remote Control
Another reason why a wifi connection is essential, is the remote control it provides. You can adjust settings, tilt the camera and perform other functions without physically touching the camera. This aspect is particularly handy when the camera is set up in an unreachable or hazardous area.
Data Storage
With a wifi connection, Wyze security cameras have the advantage of cloud storage. This feature enables recorded footage to be stored off-site, eliminating the risk of data loss due to theft or damage. Furthermore, cloud storage allows for easy access and retrieval of recorded videos from anywhere at any time.
Advanced Features
Advanced features like motion detection and alerts are only possible with a wifi connection. When motion is detected in the specified zone, the camera sends an alert to your device, allowing you to check on the situation immediately. More advanced models may also provide facial recognition or line-crossing features, enhancing security further.
So, from a broader perspective, establishing a wifi connection for your Wyze camera goes beyond streaming live videos or storing footage on the cloud. It’s about optimizing its capabilities to give you total control over your security system while adding peace of mind, convenience, and effectiveness in protecting your security and privacy.
Key Tools Required for Setting Up Wyze Camera’s Wireless Connection
If you’re planning to establish a fresh Wifi connection for your Wyze Camera, it is essential to have the right set of tools at your disposal. Let’s cycle through the crucial instruments you will need for a successful Wyze camera Wifi configuration.
Stable Internet Connection
The most important requirement for your Wyze camera’s Wi-Fi setup is a solid and consistent wireless internet connection. Ensure the router is functioning properly and broadcasting a strong signal. You can utilize your smartphone or other devices to affirm the internet speed and connectivity strength.
Wyze App on Smartphone
Another indispensable tool is the Wyze app installed on your mobile device. The Wyze app acts as a control panel, letting you manage your camera’s settings, including its Wifi connectivity. Available for both iOS and Android, make sure you have this app downloaded and installed on your phone.
Access to Wyze Camera and Power Source
Physical access to your Wyze camera is also necessary, along with a reliable power source. You need to interact with the camera’s buttons and ports during the setup process. Be prepared with an appropriate power cable and socket, or a fully-charged battery.
Knowledge of Network’s SSID and Password
Above all, be ready with your Wifi network’s SSID and password. Only with these credentials can you connect your Wyze camera to the Wifi network. Ensure that you enter these details accurately in the Wyze app during the setup process.
In conclusion, setting up your Wyze camera onto a new Wifi network doesn’t necessarily entail a long list of resources. All you need are these key tools: a stable internet connection, the Wyze app installed on your smartphone, access to your camera and its power source, and your Wifi credentials.
Preparing your Wyze Camera for Wifi Connection
Before you begin the process of linking your Wyze Camera to a new wireless network, there are a few critical steps you must take to ensure a smooth connection. Proper initial steps will help avoid unnecessary issues and potential connection disruptions.
Power up your Wyze Camera
Primarily, make sure that your Wyze Camera is properly powered on. Use the supplied power adapter, connected to a reliable power source, to prevent any interruptions during the setup process. It’s essential to wait until the device finishes its initial startup, evident when the status light turns solid blue.
Get Wyze App Ready
Next, ensure that you have the Wyze app installed and updated on your smartphone or tablet. You will need the latest version for the optimal experience and compatibility with your camera. Log into your account or create a new one if you’re new to Wyze.
Ensure you have the Wifi details
Additionally, you’ll need to know the details of the wireless network you’re connecting your camera to. These details include the network name (SSID) and password. Remember that Wyze Cameras support only 2.4 GHz networks, so make sure your router is correctly set up and working. Be certain that the wifi connection is secure and reliable, as an unstable or weak signal may interrupt or hinder the connection process.
Placement of your Wyze Camera
Lastly, consider positioning your Wyze Camera. The location of your camera can greatly impact its connectivity and performance. Ensure that it’s within range of your wifi router and that there are minimum obstacles between them. The camera should also be placed in an area where it can clearly capture the desired scene. Try to avoid direct light sources that can affect the image quality.
Remember to take the time to prepare before attempting to connect your Wyze Camera to the wifi network. By taking these initial steps, you’ll ensure a smoother, more effective setup process and better long-term operation of your camera.
First Steps in Setting up Your Wyze Camera’s Wifi Connection Using the App
Initial App Launch
Firstly, you’ll need to access the Wyze application on your smartphone. This is where the initial setup for connecting your Wyze camera to your wifi network will take place. The app is compatible with almost all smartphones, so it is almost a guarantee that your device can host it. After downloading and installing the application from your device’s app store, click on the Wyze app icon to open it.
Account Creation and Sign-in
For newcomers to the Wyze app, you will be prompted to create a new account or log into an existing one. This account will help manage your cameras and is crucial for enabling online features like cloud storage and notifications. Setting up an account consists of providing your email address and creating a password. Those who already have an account can log in with their email and password.
Granting the Necessary Permissions
Once you have successfully logged into your account, the application might ask for permission to access specific resources on your smartphone. These permissions usually include allowing access to your phone’s camera and storage. They are essential for the app’s smooth operation and to enable some of the key features of the Wyze camera.
- Access to the phone’s camera allows scanning the unique QR code during the camera setup process.
- Storage access is to save footage captured by the Wyze camera on your device.
After granting permissions, you are prepared for the process of connecting your Wyze camera to your new wifi network.
Steps to Sync Your Wyze Cam with the Wyze Application
Setting up your Wyze Camera with the Wyze app is a simple process. With just a few steps, you can monitor and control your camera from anywhere using the app.
Step 1: Install the Wyze App
The first step is installing the Wyze app on your mobile device. You can download it for free from the Google Play Store for Android devices or the App Store for iOS devices.
Step 2: Open the App and Sign In
Once you have successfully installed the app, open it and sign in using your Wyze account. If you don’t have an account yet, you can sign up for a new one from the app itself.
Step 3: Add a New Device
After signing in, tap the plus (+) icon at the top right corner of the home page. This action will initiate the process of adding a new Wyze device.
Step 4: Select Your Wyze Camera Model
Now select the model of your Wyze camera from the list of devices. You can find this information on the packaging or user manual of your camera.
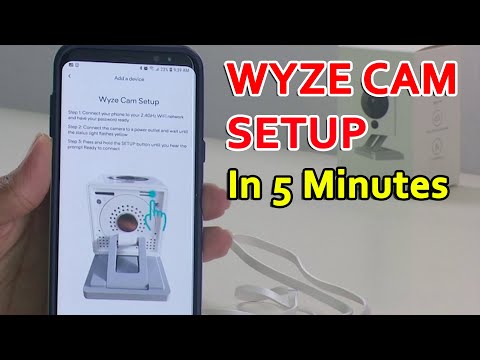
Step 5: Connect to WiFi and Scan QR Code
Next, follow the prompts within the app to connect your Wyze camera to your wireless network. Ensure your phone is connected to the same network. After this, a unique QR code will be generated by the app. Hold your phone about 5 inches away from the camera to scan this QR code.
Step 6: Finish Setup
Once the QR code is successfully scanned, you will hear a voice prompt from the camera. Confirm it in the app, follow any remaining prompts, and wait for the camera to finish its setup process. This might take a few moments.
Congratulations! You have now successfully synced your Wyze camera with the Wyze app. You can now monitor and control your camera from your smartphone or tablet.
A Detailed Guide on How To Link Your Wyze Camera with a Fresh Wifi Network
Integrating your Wyze camcorder with a new Wifi connection doesn’t have to be a daunting task. Here’s an outlined methodology to make the process effortless and swift.
Step-by-step process of linking Wyze Camcorder with a New Wireless Connection
- Starting the Process: Initially, confirm that your new wireless network is functioning well. The green light at the back of your Wyze surveillance device should confirm this status. If it’s flashing, your wireless network is not stable and you may need to rectify this before proceeding.
- Tuning app Settings: Launch the Wyze application on your smartphone and navigate to the settings option. Here you will spot the ‘network change’ choice, click on it to start adjusting your connection details.
- Updating Network Details: At this point, key in your new Wifi network credentials (SSID and password). Make sure that the details are correct to guarantee a successful connection. Remember, the camera and the smartphone should be on the same network during this process.
- Finalizing Connection: The application will generate a QR code once the new details are inputted. Scan the QR code using the Wyze device and wait for it to connect. A voice command will affirm a successful connection.
With these steps, linking your Wyze camcorder to a fresh wireless signal becomes straightforward. Guaranteeing that you can relocate your surveillance device without worrying about losing your connection to the application. Stay connected, stay in control.
Troubleshooting Steps When Your Wyze Security Camera Fails to Connect to the Wi-Fi Network
There are cases when the Wyze camera fails to connect to a new WiFi network. This situation leaves your security camera disabled, hence not serving its monitoring purpose. Dealing with connection failures can be frustrating. The following are some steps to help you troubleshoot these problems:
Check Your Internet Configuration
Begin by checking your internet connection. Look to ensure that your internet is working correctly and has a strong signal. The Wyze camera requires reliable Wi-Fi to function properly. It is also necessary to ensure that your wireless network is 2.4GHz since the Wyze camera isn’t compatible with 5GHz networks.
Reset Your Wi-Fi equipment
Resetting your router can also fix if you’re experiencing connectivity issues. Switch your router off, wait for around one minute, and then switch it back on. Allow it a few minutes to fully reboot before you attempt to connect your Wyze camera again.
Software Update
Check if there is a firmware update available for your Wyze Camera. Use the Wyze app to check for and perform updates. Outdated software might be the reason behind the problem.
Reset Your Wyze Camera
If all of the above steps fail, consider resetting your Wyze camera. This is usually done by pressing and holding the reset button on the camera’s bottom for five seconds. Be sure to reconfigure it to your Wi-Fi network again after resetting.
In conclusion, WiFi connectivity issues can hinder the proper functioning of your Wyze camera. Hence, it is important to always ensure that the WiFi network is secure, stable, and functioning effectively. Trying the above troubleshooting methods might help you resolve the issue and get your Wyze camera working optimally again.
Useful Tips for Sustaining a Reliable Wireless Internet Connection for Your Wyze Cam
Once you’ve set up your Wyze camera system to your home’s wireless internet network, it’s crucial to ensure a secure and stable connection. An unstable or poor connection could lead to loss of video feed, or delayed notifications. Here are some key practices that could assist with maintaining a consistent wifi connection with your security device.
Maintaining a Proximity to the Router
It’s important to position your Wyze camera such that it remains within a reasonable range of your Wi-Fi router. A good rule of thumb is to place the camera within 50 feet from the router. Walls, concrete and other obstructions, should be factored in when determining the ideal distance.
Limiting Demand on Your Network
Another factor affecting your camera’s connection stability involves the overall bandwidth usage on your network. Multiple devices streaming, downloading, or uploading large files can negatively impact the network’s performance. Consider scheduling high-demand network tasks during off-peak times to reduce competition for bandwidth.
Resetting Your Equipment Regularly
Occasional resets for your router and Wyze Camera can work wonders for boosting your Wi-Fi signal and maintaining a stable connection. Not only does this allow the devices to cool down, but it also clears out any minor glitches that may have developed over time.
Securing Your Wi-Fi Network
A secure network is fundamental to maintaining a stable connection. Make sure to protect your Wi-Fi with a strong password, and change it periodically. Additionally, be mindful of any unusual activity on your network that could indicate a security issue.
Conclusively, while the Wyze Camera is designed to maintain a sturdy Wi-Fi connection, occasional troubleshooting may be necessary. The above tips can help ensure your camera remains connected and functioning efficiently.
Robust Features Enabled by Linking Wyze Camera to Wireless Internet
Linking your Wyze Camera to a Wireless Internet network amplifies the device’s functionality, providing access to an array of advantageous features. Not only does it provide real-time video surveillance, but this synchronization also allows for seamless remote monitoring and enhanced smart home integration.
Real-time Remote Monitoring
When your Wyze Camera communicates with your Wifi network, it enables remote monitoring from anywhere around the world. Once linked, you can easily stream live footage directly to your smartphone or tablet. This setup ensures round-the-clock surveillance, keeping you connected to your premises and readily alerted in case of any suspicious activity.
Enhanced Playback and Storage
An added advantage of establishing a connection between your Wyze Camera and your Wifi network is the enhanced playback and storage. Recorded footage can be easily viewed and downloaded remotely. Moreover, you can also leverage cloud storage options to securely save and archive your valuable video clips for an extended duration, avoiding the risk of video loss or damage to physical storage mediums.
Integration with Smart Home Ecosystem
Pairing a Wyze Camera with a Wifi network also allows for seamless integration into your existing smart home ecosystem. The Wyze app can interact with other smart devices in your household such as doorbells, locks, or lighting systems, providing a central control hub for home security. This connectivity opens the door for automation, such that certain events captured by your camera (movements, noises) can trigger relevant actions (sending alerts, turning lights on).
- Live video streaming via smartphone or tablet
- Enhanced video playback and storage
- Integration with the existing smart home system
- Real-time alerts on detecting any motion or sound.
In a nutshell, linking your Wyze Camera to a wireless network can considerably bolster your home or office security system by unlocking a range of beneficial features.
Frequently Asked Questions: Crucial Inquiries Regarding Wifi Connection with Wyze Cam
Setting up your Wyze camera to connect to a new wifi network can raise several questions. Below we cover some of the most commonly asked questions to assist you in this process:
What are the necessary steps to link my Wyze Camera to a different wireless network?
Start by pressing the setup button on the base of your Wyze camera until you hear a voice prompt saying ‘Ready to Connect’. Afterwards, proceed with the app instructions, entering your new wifi network info when prompted.
Why can’t my Wyze Camera connect to my wireless network?
Various culprits might cause this. The distance between your camera and router – a weak signal won’t allow your camera to connect. Also, verify your network supports 2.4GHz band as Wyze Cameras don’t support 5GHz networks. Typographical errors in the network name or password can also be the issue.
Can I connect my Wyze Cam to multiple wifi networks?
Wyze Camera only supports connection to one wifi network at a time. If you wish to connect your camera to a new network, you’ll need to manually reconfigure it to the new network.
Is it essential for my mobile device and Wyze camera to be on the same network?
During the setup process, it’s crucial for both devices to be on the same network. However, once the setup is complete, you can access your camera remotely as long as it’s connected to the internet.
Can I use my Wyze Cam without Internet connection?
No, internet connectivity is crucial for the camera’s operation. It’s necessary for the live streaming, notifications, firmware updates, and saving footage to the cloud.
Having these answers handy will certainly help in setting up and troubleshooting your Wyze Camera’s wifi connection.
FAQ: How to connect wyze camera to new wifi
What is the process of connecting Wyze Camera to Wifi?
To connect a Wyze Camera to Wi-Fi, first launch the Wyze app and select the ‘+’ button to add a new device. Power on your Wyze camera by plugging an adapter into a power outlet and connect it to the camera. Press the ‘Setup’ button for 3 seconds until you hear a beep and the status light flashes yellow. Scan the QR code on your mobile screen with the Wyze camera until you hear a ‘QR code is scanned, please wait’ voice reminder. Then, click ‘I heard ‘QR code is scanned’ and wait for the camera to connect to the Wi-Fi network.
Why can’t I connect my Wyze Camera to Wifi?
There can be a few reasons why the camera can’t connect to WiFi. These include entering the wrong password or a WiFi signal that is too weak to connect. The camera only supports 2.4GHz networks, not 5GHz networks. It’s also possible that firewalls and other security settings can block the connection.
How to reset the WiFi connection on my Wyze Camera?
To reset the WiFi connection on your Wyze Camera, press and hold the setup button on the bottom of the camera for 10 seconds. This will factory reset the camera. Then you can start the new connection process.
Can Wyze Camera be connected to multiple WiFi networks?
The Wyze camera can only connect to one Wi-Fi network at a time. If you want to switch it to another network, you need to reset it and then follow the setup process for the new network.
Why does my Wyze Camera frequently disconnect from WiFi?
There could be several reasons for frequent disconnections. The most common are a weak WiFi signal, an unstable internet connection, a problem with the Wyze Cam firmware, or the camera being too far from the router.
Can I connect my Wyze camera to public WiFi networks?
It is not recommended to connect your Wyze camera to public WiFi networks. These networks often require additional logins or accept terms pages, which the Wyze Cam doesn’t support. They’re also less secure than private networks.
Does Wyze Camera require a WiFi connection to operate?
Yes, a Wi-Fi connection is necessary for the Wyze Camera to operate and provide real-time monitoring.