Introducing a new layer of safety to your home becomes an absolute necessity in the modern era. Enhancing your home security with a floodlight security camera serves as an efficient way to keep an eye on the surroundings of your house and wards off intruders. This writing will detail a stepwise procedure to help you acquaint with the process of wiring a security camera equipped with floodlights.
Often, homeowners shy away from technical installations due to perceived complexity. However, understanding the detailed instructions can make the process of setting up your floodlight camera a hassle-free task. This guide aims at simplifying the process and empowering you to install the camera by yourself.
We will cover all the important sections, from selecting the ideal location for installation to connecting wires for the efficient operation of your camera. Strong emphasis is placed on the wiring procedure as it forms the foundation for the smooth running of your floodlight security camera. So, whether or not you’ve done this before, this article will make the process clear and approachable.
Remember, protecting your home with advanced security measures is not merely a luxury anymore, it’s a necessary step towards safeguarding your family and possessions. As such, let’s dive in and understand how to wire your floodlight security camera step-by-step.
A Closer Look at the Advantages of a Floodlight Camera from Ring
Security and convenience are paramount in today’s ever-evolving technological age, and having a reliable surveillance system has become a necessity, not a luxury. Presenting the Ring brand’s groundbreaking floodlight camera, a device that brings together lighting, innovative security camera technology and a user-friendly interface.
Enhanced Security and Peace of Mind
All-inclusive home security is the major strength of a Ring-branded floodlight surveillance solution. It features high-definition video recording, allowing homeowners to have a crystal-clear view of their surroundings, be it day or night. Additionally, the device is equipped with advanced motion-detection sensors, immediately alerting users via their smartphones about any suspicious activity.
Lightning Intensity and Energy Efficiency
Aside from its alarm features, this high-tech camera also boasts robust and efficient LED floodlights. It can intensely illuminate any external area of your property making your surroundings less appealing to unwanted guests. Plus, being LED, they are extremely energy-efficient, ensuring you of cutting back on your electricity bills.
Accessible Home Surveillance
The user-friendly nature of the Ring floodlight camera is also worth mentioning. Its compatibility with various devices makes remote monitoring significantly effortless. Whether you’re just in the next room or thousands of miles away, you can conveniently access the camera feed in real-time, straight from your smartphone or tablet.
- Two-way communication feature: With built-in speakers and a microphone, the camera offers a two-way communication feature. In cases of unwanted trespassing or a simple package delivery, this function allows homeowners to speak directly to the person within the camera’s range.
- Easy installation process: Finally, setting up your Ring floodlight camera is a straightforward task. Even with minimal technical knowledge, you can install and sync the camera with your mobile device or home network comfortably.
Given these unparalleled benefits, the Ring Floodlight Camera proves to be an exceptional addition to any home. It ensures comprehensive protection for your property, giving homeowners the ultimate peace of mind.
Essential Items for Installing Your Ring Floodlight Security Camera
Before you embark on installing your Ring Floodlight security camera, it is crucial that you have all the essential tools and equipment ready. By ensuring you have all the necessary items up front, you can avoid unnecessary interruptions and ensure a smooth setup process.
Tools and Equipment
- Wire Strippers: To properly connect the wires of your Ring Floodlight camera, you will need a good pair of wire strippers. This tool is used to strip the insulation from the wires to enable effective electrical connections.
- Junction box: An outdoor-rated junction box would be needed to protect the electrical connections. It should be waterproof and durable enough to withstand harsh weather conditions.
- Mounting Tools: You will need a set of mounting tools, such as a screwdriver, drill, and screws, to mount your Ring Floodlight Camera securely to your chosen location.
- Wire Connectors: You’ll need wire connectors or wire nuts to securely connect the camera’s wires to your home’s wiring.
- Ladder: Depending on the camera’s mounted location, a ladder might be necessary to safely reach the installation spot.
Keep in mind that all electrical works come with a risk. If you are not comfortable dealing with electrical wiring or if your home’s electrical system doesn’t match the Ring Floodlight’s requirements, it is recommended to hire a professional electrician for the installation.
Other Requirements
Aside from the hardware essentials, you’ll also need to have your Ring account set up and functioning. Without this, you won’t be able to access or control live view settings, motion alerts, or other camera functions.
Also, a strong Wi-Fi signal is crucial. The Ring Floodlight camera works over Wi-Fi, so your connection should be strong and reliable at the installation location. If your signal is weak, you might want to consider a Wi-Fi range extender.
Finding the Optimal Spot for Your Security Floodlight Camera by Ring
When it comes to enhancing your home security, choosing the right spot for your Ring security floodlight camera can make all the difference. This decision is not as simple as it might seem, as there are several factors that you need to consider to make the most out of your security device.
Considerations When Selecting an Install Location
Field of Vision: The primary consideration when determining where to install your floodlight camera should be its field of vision. The wider area it covers, the better. Higher locations often provide a larger view, making corners of the house, particularly where two walls meet, ideal places since the view angle could cover two sides of your property.
Height: The height of the camera will also significantly influence its effectiveness. Placed too low, the camera can be tampered with, whilst too high a positioning can interfere with capturing high-quality video. As a general rule, it should be installed 9 feet from the ground.
Lighting: Since a floodlight camera also serves to illuminate dark spots around your property, consider installing it in a location that will benefit most from additional lighting. This may be the entrance to your house, a garage, a yard, or even a porch.
Proximity to Wi-Fi: Lastly, bear in mind that the closer your device is to your Wi-Fi source, the better the signal, and therefore the higher the video quality will be.
Summary
To sum up, for optimal performance, your Ring floodlight camera should be positioned in a spot that maximizes the field of vision, at an appropriate height, in an area that benefits from further lighting, and within good proximity to your Wi-Fi source. Taking all these factors into consideration will aid in enhancing the effectiveness of your home security system.
First Step: Getting Your Setup Zone Ready
The first and crucial step in installing a Ring Floodlight Camera is preparing the area where the device will be installed. Correct initial setup is vital for the camera to perform optimally and cover the intended areas.
Area Consideration
Pick an area that needs surveillance. It could be your driveway, yard, or porch. The chosen area should provide a wide enough view for the camera to cover and the floodlights should be able to adequately illuminate it. Consider these factors when determining the required height and angle of the camera as well.
Power Source
Ensure you have a reliable power source close to your installation spot. The Ring Floodlight Camera requires electrical power to function, so you’ll need an outdoor electrical box within reach. If an existing light fixture will be replaced by the Ring Floodlight Camera, you can likely use the current electrical connections.
Required Tools
- Make sure you have all tools at hand. A screwdriver, drill, mounting hardware, safety goggles, and a ladder are often needed.
- Specific Ring tools: A small level bubble and screwdriver are often included with the Ring Floodlight Camera package. Make sure you have these tools before you begin.
| Area | Power Source | Tools |
|---|---|---|
| Wide enough view for optimal surveillance | Outdoor electrical box within reach | Screwdriver, drill, safety goggles |
In summary, preparing your installation area involves picking the correct location with an appropriate power source and having all the tools necessary for the job. This step is critical to avoid setbacks during the installation and to ensure optimal performance from your Ring Floodlight Camera.
Step Two: Setting up the Mounting Bracket
After successfully turning off the power supply, the next essential step is to fix the mounting bracket. This is a crucial element that offers support for your Ring Floodlight Cam.
You’ll find the mounting bracket included in the Ring Floodlight Cam package. It is designed to fit perfectly to provide a solid foundation for your device.
Begin by identifying a suitable area where you want to install the Floodlight Cam. Remember to consider the most effective field of view from the area you choose. Also, the mounting surface should be robust and secure to support the weight of the camera.
Fixing the Mounting Bracket
Commence the bracket installation process by placing the mounting bracket against the chosen location. Use a marker to identify where the screws will go. It is important to ensure that the bracket is level before marking the screw positions. This ensures that your Floodlight Cam remains stable and in the correct position once completed.
Next, using a drill, make holes in the wall at the marked points. Once you’ve drilled the holes, align the bracket to the wall holes. Ensure the mounting bracket is well-positioned and in level.
Lastly, attach the bracket to the wall using the screws provided in the package. Tighten the screws until the bracket is firmly in place, but be careful not to over-tighten as this could damage the wall or the bracket.
Tip: If you’re attaching the bracket to a surface like brick or stucco, you’ll need to use a masonry drill bit and the included wall anchors.
After successful installation of the mounting bracket, it should hold firm against the mounting surface, ready to support your Ring Floodlight Camera.
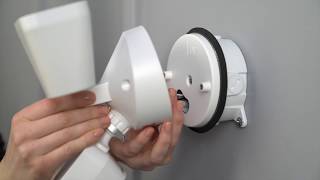
Step Three: How to Hook Up Your Ring Spotlight Cam Wiring
Once you’ve mounted your Ring Spotlight Camera and have everything in place, the next step is linking your wiring. This step necessitates caution, as it involves dealing with electrical installations. Below, you’ll find an instructional guide on how to go about connecting your camera’s wiring.
Before You Start
- Ensure the power to your floodlight is switched off. You can ensure this by flipping off the switch on your main electrical panel.
- You will need a pair of wire strippers, wire connectors, and a screwdriver for this procedure.
Connecting Your Spotlight Cam Wiring
- Using the wire strippers, make sure all wires on the camera and the junction box are stripped back about 1/2 inch to expose the bare wire. You should have three wires: the live wire (black), neutral wire (white), and ground wire (green).
- Start by linking the ground wire from the camera to the ground wire in your junction box. To do this, hold the ends together and twist on a wire connector until it’s tight.
- Repeat the process above with the live wires and then with the neutral wires. Make sure all your connections are secure.
- When all wires are connected, carefully push them into the junction box.
- Secure the camera on the mounting bracket and tighten it up, making sure it’s firm and secure.
- Restore power and go through the set-up process on the Ring app to complete the installation.
Note: If you are unsure or uncomfortable with any part of this process, it is recommended to involve a professional electrician to ensure safe and correct installation.
Step Four: Securing the Ring Security Camera with Floodlight to its Fixture
After ensuring that the electrical connection is properly made, the next imperative step is affixing the Ring security Floodlight Camera to its fixed bracket. If everything is placed correctly, it should fit and lock into position smoothly. The aim is to ensure that the camera stays resilient to external environmental conditions and lasts for a substantial amount of time without any hitch.
Here’s a step-by-step guideline on how to go about it :
- Start by taking hold of your camera with floodlight and position it at an appropriate angle relative to the fixed mount. The camera should be facing the area you want to monitor.
- The camera is designed to slot into the mount easily. Therefore, carefully align the holes on the device with those on the mount. Make sure not to force it in as it may result in unnecessary damage.
- Once the alignment is perfect, get the screws provided with the packaging. Insert them through the slots and start to gently screw them on. For this process, you might need a screwdriver that matches the size of the screws.
- Ensure that all screws are tightened properly. But be cautious not to overtighten as it may lead to strain or breakage. The device should be firmly secured, but not overly tightened.
- After you have successfully attached the camera to the mount, make sure the position of the device is accurate. It should be pointed towards the area you wish to keep an eye on for maximum efficiency.
To conclude, keep in mind that securing the Ring Floodlight Camera to its bracket can take some time. Maintain patience and ensure everything is done accurately. Correct installation of this device ensures optimal performance and functionality of this security camera. Thus, follow every step with utmost precision.
Step 5: Examining the Electrical Connection of your Ring Floodlight Cam
Once you’ve successfully connected your Ring Floodlight Camera wiring, it’s essential to check if the setup works effectively. This phase, more commonly known as the testing stage, entails several procedures you must properly carry out to determine if the camera’s electrical connections function as they should.
Initiate the Primary Power Source
Firstly, turn on the primary power source. Caution: this step should only take place after ensuring that all your wiring connections are correctly and securely in place. Turning on the power prematurely can lead to dangerous electrical mishaps, so double-check your connections first.
Once complete, your Ring Floodlight Cam should now power up. Pay attention to any lights or signals on the camera. In the case of unexpected reactions or if it does not power on, reexamine your wiring process for potential errors.
Conducting through a Smartphone
Next, open the Ring app on your smartphone. Given that your setup process was complete and successful, your Floodlight Cam should be detectable. Note: if this is your first time setting up the camera, you might need to follow on-screen instructions to sync it with your device.
- Choose the Ring Floodlight Camera.
- If prompted, enter your Wi-Fi password to connect your camera.
- From here, you should have access to the camera’s live feed.
If you can view the live feed on your smartphone, it implies that your Floodlight Camera functions correctly and your wiring process was successful. However, in any case that you encounter difficulties throughout this stage, it might be best to consult a professional or get in touch with Ring’s customer service for assistance.
Step 6: Adjusting The Settings Of Your Advanced Lighting Detector Camera
Now that your illuminating security camera is installed and connected successfully, the next stage in the setup process is to fine-tune its settings to fit your personal preferences and safety requirements. This portion guides you on how to proceed with that.
Tweaking Video Settings
Adjust the video settings to get the best possible footage quality from your camera. You’ll want to adjust aspects such as resolution, video length, and selected recording area. Experiment with different configurations to see which works best according to the camera’s placement and your specific needs.
- Resolution: Higher resolution provides better video clarity, but remember it’ll use more data.
- Video length: While shorter videos save storage space, longer ones can capture more extended events.
- Selected recording area: Define the area in your camera’s view that you want it to focus on for recording. This way, it won’t take unnecessary footage, such as of passing cars if your focus area is the driveay.
Configuring Motion Detection Settings
Your floodlight camera uses advanced motion detection technology to send you alerts whenever it detects activities in its field of view. Now, you may want to adjust these settings to suit your needs better. It lets you choose how sensitive the camera should be to movement.
- Sensitivity: If your camera sends too many false alerts, you may want to reduce its sensitivity so it only triggers when there’s significant motion.
- Schedule: You can set a schedule for when the motion detection feature should be active. It can help avoid false notifications during high traffic hours.
The customization doesn’t stop here, as you can integrate with different devices, adjust light settings, and more. Every user’s needs can vary, so make sure to cater these settings according to what works best for you and your home.
Solving Common Problems when Wiring a Floodlight Camera from Ring
Ring’s Floodlight camera requires correct wiring in order to function optimally. However, there are instances when you may encounter issues during the setup or operation. This article provides a step-by-step guide to troubleshoot these common problems.
Problem 1: The camera does not power on
If your floodlight camera isn’t powering on, it could be due to several reasons. Firstly, check connections. Ensure that the wires connected to the floodlight camera are tightly secured and not loosened. Additionally, verify your power source. If the source of electricity isn’t functioning, the camera won’t receive needed power.
Problem 2: The floodlight is non-functional
If the floodlight is not operating as expected, it can be due to incorrect wiring. The floodlight and the camera might have different wiring routes, hence, verify your wiring diagram. Follow the provided manual to confirm if the wiring was done according to company standards.
Problem 3: The camera does not connect to Wi-Fi
In some cases, you might find your floodlight camera not connecting to Wi-Fi. This could be because of inadequate power supply. For Wi-Fi connection, the camera requires a consistent power supply. Ensure the wires for power are not frayed, and the power source is consistent.
Problem 4: The camera is not recording videos
Finally, if the camera is not recording videos, firstly, check the settings. It may be due to incorrect settings. Also, verify the storage capacity. If your storage capacity is full, the camera might stop recording new content.
By systematically addressing these common problems, you can successfully troubleshoot and enjoy uninterrupted operation of your Ring Floodlight camera.
Ensuring the Optimal Performance of Your Surveillance Floodlight Camera by Ring
Regular inspections and cleaning
By keeping a routine inspection of your illuminating security camera from Ring, you can ensure its functionality and durability. Consider checking all its components, from the wiring to the floodlights and camera lens. Specifically, assess for any signs of wear and tear, rust, or corrosion.
Moreover, the cleanliness of your device greatly affects its performance. Therefore, gently clean the camera lens with a soft cloth to remove dust or dirt. Also, clean the light fixtures of your security camera to maintain their brightness.
Firmware updates
Emphasizing the importance of software updates is crucial. Consistently upgrading to the latest firmware can significantly improve the efficiency of your security device. These updates often come with new features and rectifications that enhance the system’s overall performance and security.
Resetting the device
If your Ring floodlight camera starts showing functioning issues, a system reset may be necessary. However, do not reset the system without professional advice as it may lead to data loss or further technical issues.
Weather considerations
As an outdoor security device, your floodlight surveillance camera by Ring is exposed to different weather elements. Consequently, to maintain its performance, make sure the camera is ideally positioned and sheltered, where possible, from excessive rain, dust, or snow. Furthermore, during extreme temperature conditions, monitor the functionality of your device regularly.
Battery care
If your security system is battery-operated, routine checks and appropriate battery care are required to ensure that your system remains functional and reliable. Replace batteries when necessary to avoid any possible performance interruptions.
FAQ: How to wire a ring floodlight camera
How often should I maintain my Ring Floodlight Camera?
It depends on the environment, but as a general rule, the camera should be checked every three to six months.
What should I do to maintain my Ring Floodlight Camera?
Check for any physical damages, clean the lens with a soft, lint-free cloth, ensure the light bulbs are working and update the camera software to keep it functioning at its best.
What’s the proper way to clean the lens of the camera?
Use a soft, lint-free cloth to gently remove dust and smudges. Avoid using harsh chemicals or abrasive materials.
How can I ensure my Ring Floodlight Camera software is up-to-date?
Ring Floodlight Cameras typically update automatically. However, you can always check for updates through your Ring mobile app or on the Ring website.
What should I do if the Ring Floodlight Camera is not working despite maintenance?
If your camera is not working after regular maintenance, it’s recommended to contact Ring customer support for further troubleshooting or potential replacement if it’s under warranty.