Table of Contents
Understanding the Features of the Reolink Argus 3
If you’ve been searching for a reliable, easy-to-use security camera, chances are you’ve come across the name Reolink Argus 3. This little powerhouse has made waves in the home security market, with its advanced features and affordable price tag. But what makes this wireless security camera stand out? Let’s dive in!
Key Specifications and Features of the Reolink Argus 3
Reolink Argus 3 offers several impressive features that make it a fantastic choice for anyone looking to enhance their home security:
- Full HD Video Quality: The Argus 3 boasts 1080p resolution, offering crisp and clear images, day or night.
- Starlight Night Vision: The superior starlight CMOS sensor provides clearer night vision, up to 33 feet.
- PIR Motion Detection: With its advanced PIR sensor, this camera can accurately detect movements to trigger alerts.
- Two-way Audio: Speak and listen to your visitors with the built-in microphone and speaker.
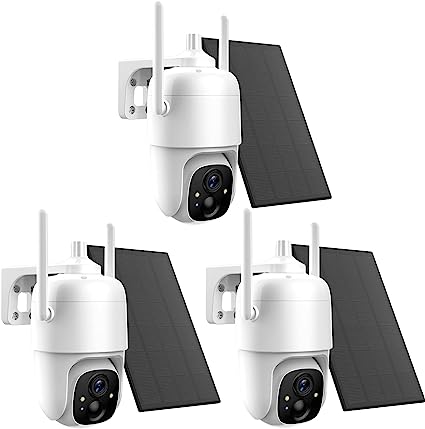
- Solar Powered: Connect the Argus 3 to the Reolink Solar Panel for non-stop power supply.
- IP65 Certified Weatherproof: Built to withstand the harsh outdoors, from rain to snow.
Personal Experience with the Reolink Argus 3
Before purchasing the Reolink Argus 3, I did a lot of research on various home security cameras. What drew me to the Argus 3 was its robust set of features at an unbeatable price.
Once I received my Reolink Argus 3, I was amazed by the simplicity of the setup process. The instructions were easy to follow, and within minutes, my camera was up and running. The Reolink app was intuitive and user-friendly, making it easy to customize settings and view live footage.
The image quality of the Argus 3 was excellent, even in low-light conditions. The Starlight Night Vision was notably impressive, providing clear images even in complete darkness. The Two-way Audio function was helpful when I needed to communicate with delivery personnel.
I decided to purchase the optional Reolink Solar Panel for a continuous power supply. Despite my initial apprehension, I found the solar panel to be extremely effective and relieved me of the worry of recharging the battery.
Setting Up the Reolink Argus 3: A Step-by-Step Guide
If you’re like me, the words “tech setup” might make you break out in a cold sweat. But don’t worry – setting up the Reolink Argus 3 is a breeze! Let’s walk through the process together.
Unboxing the Reolink Argus 3
When you first open your new Reolink Argus 3, you’ll find everything you need to get started:
- Reolink Argus 3 Camera
- Rechargeable Battery
- Outdoor Security Mount
- Mounting Hole Template
- Reset Needle
- Surveillance Sign
- Pack of Screws
- USB Cable
- Quick Start Guide
Installation Steps for the Reolink Argus 3
Getting your Reolink Argus 3 up and running is simple. Here are the steps I followed:
- Charge the Battery: First things first, you’ll want to fully charge the battery using the included USB cable. A red LED on the camera indicates that it’s charging.
- Download the Reolink App: While the battery is charging, download the Reolink App on your phone. This app will be your main point of access to the camera.
- Add the Camera to the App: Open the app, tap on the “+” icon to add a new device. Scan the QR code on the camera to connect it to the app.
- Installation: Once the camera is connected to the app, it’s time to install it in your chosen location. Use the provided mounting hole template and screws to secure the mount, then attach the camera.
- Connect to Wi-Fi: Back in the app, follow the voice instructions to connect the camera to your Wi-Fi network.
Personal Experience Setting Up the Reolink Argus 3
When I first purchased the Reolink Argus 3, I’ll admit I was a little nervous about the setup process. I’m not the most tech-savvy person, and I was worried it would be over my head. I was pleasantly surprised to find just how straightforward the process was.
The Quick Start Guide provided with the camera was easy to understand, and the step-by-step instructions on the Reolink App were incredibly helpful. I appreciated how each step was accompanied by a voice prompt – it reassured me that I was doing things correctly.
I chose to set up my camera near my front door. The outdoor security mount provided with the camera made installation a breeze. Once the mount was secured, it was easy to attach the camera and adjust it to the desired angle.
Connecting the camera to my Wi-Fi network was the final step. This was as simple as following the voice prompts on the Reolink app. Within a few minutes, my camera was connected and ready to go!
My Journey with the Reolink Argus 3: A User’s Experience
As a homeowner always on the quest for better security solutions, the Reolink Argus 3 caught my attention. Since getting it, I’ve enjoyed learning its ropes and utilizing its features. So, allow me to guide you on using the Reolink Argus 3.
Navigating the Reolink App
The heart of the Reolink Argus 3 experience lies in its accompanying Reolink app. Upon launching the app, you’re greeted with a straightforward interface:
- Live View: Here, you can view real-time footage from your camera. I was pleasantly surprised by the video quality, crisp and clear in both daylight and nighttime conditions.
- Playback: Access recorded footage here. It’s intuitive, with time and date stamps helping me pinpoint the footage I needed.
- Device Settings: This section allows you to personalize the camera settings to suit your needs.
Customizing Settings of the Reolink Argus 3
Customizing the Argus 3 to suit my needs was a breeze. From adjusting the sensitivity of the PIR motion sensor to tweaking the privacy settings, the app allowed me to tailor the camera’s functionality to my preferences.
A feature I found particularly handy was the ability to set custom motion zones. This helped eliminate false alarms from high-traffic areas.
Making the Most of the Argus 3’s Features
Since setting up my Reolink Argus 3, it’s been an integral part of my home security system. Here’s how I’ve been making the most of its features:
- Two-way Audio: As someone who frequently receives visitors and deliveries, this feature was a game-changer. The ability to communicate directly through the camera without opening the door is genuinely convenient.
- Motion Detection Alerts: The app sends instant alerts to my phone whenever motion is detected. It’s reassuring to know that I can keep tabs on my home, no matter where I am.
- Starlight Night Vision: I’ve been truly impressed by the clarity of the night vision. It’s provided peace of mind, knowing I can clearly see what’s happening around my home even in the middle of the night.
Storing and Accessing Recorded Footage
The Reolink Argus 3 offers flexible options for video storage, including cloud storage and micro SD card storage. I opted for the Reolink Cloud, which has been incredibly reliable and easy to use.
Accessing the recorded footage is straightforward. I simply navigate to the Playback section in the app and select the date and time of the footage I want to view. It’s simple, streamlined, and user-friendly.
Powering Your Reolink Argus 3: Battery and Solar Power Options
As an owner of the Reolink Argus 3, one of the features I love about this home security camera is its versatility in power options. It can run on its rechargeable battery or connect to a solar panel for a continuous supply. Let’s delve into each power option and share my personal experience with them.
Rechargeable Battery: An Eco-Friendly Power Solution
The Reolink Argus 3 comes equipped with a rechargeable battery, and it’s one of the key selling points that attracted me to this camera. It’s not only environmentally friendly but also economical in the long run as you don’t have to keep buying replacement batteries.
I’ve found that the battery life is impressive, lasting for about six months on a single charge based on my usage. The charging process is simple – you just need to use the USB cable provided in the box to charge it.
When the battery level gets low, the Reolink app sends a notification to remind me to charge the battery, a feature that I found very useful.
Solar Panel: Uninterrupted Power Supply
For continuous power supply and peace of mind, Reolink Argus 3 can be connected to the Reolink Solar Panel. Although the solar panel is an optional accessory, I decided to get one to eliminate the need for manual recharging.
The installation process was straightforward – the package includes the solar panel, a mounting bracket, and a 4-meter micro-USB cable to connect the panel to the camera. Once set up, the solar panel keeps the camera’s battery charged, particularly useful in locations where it’s inconvenient to change or charge the battery regularly.
The solar panel needs just a few hours of direct sunlight each day to keep the camera running smoothly. Even during winter, as long as there’s some sun, the panel works efficiently. This sustainable power option has been a game-changer for me, ensuring the Argus 3 is always ready and powered.
My Personal Experience with the Battery and Solar Power Option
When I initially started using the Reolink Argus 3, I was only using the battery power option. However, I soon realized that as a busy person, sometimes I would forget to recharge the battery on time. After a couple of instances of the battery running out just when I needed the camera, I decided to invest in the solar panel.
Since installing the solar panel, I’ve had a seamless experience with the Argus 3. The solar panel keeps the battery topped up, and I no longer worry about the camera running out of power. This combination of battery and solar power has provided me with an efficient, eco-friendly, and hassle-free solution for my home security needs.
Comparing the Reolink Argus 3 to Other Models: A User’s Perspective
When I was in the market for a home security camera, I had my homework cut out for me. In a market brimming with models from various brands, I found myself gravitating towards Reolink’s offerings, particularly the Reolink Argus 3. But how does it compare to other models? Let’s delve into the comparison based on my personal experience.
Reolink Argus 3 vs. Argus 2
The Argus 2, the predecessor of the Argus 3, has been a popular choice among home security enthusiasts. Like the Argus 3, it comes with features like 1080p video quality, two-way audio, and starlight color night vision. However, there are a few key differences:
- Design: The Argus 3 boasts a more modern, streamlined design compared to the Argus 2. I found it more pleasing aesthetically and less intrusive.
- Spotlight: The Argus 3 features an integrated spotlight, which can be activated by motion detection or controlled manually from the Reolink app. This feature provides color videos even at night, which is not possible with Argus 2.
- Installation Options: While both models offer flexible installation options, the Argus 3 has an additional strap installation method, making it more versatile.
Reolink Argus 3 vs. Argus Pro
The Argus Pro is another model from Reolink that’s worth considering. It shares several features with the Argus 3, but here are some differentiating factors:
- Design: The Argus 3, with its sleek and modern design, has an edge over the Argus Pro’s more conventional look.
- Night Vision: The Argus 3’s starlight color night vision and integrated spotlight significantly enhance its nighttime performance compared to the Argus Pro’s standard infrared night vision.
- Smart Home Integration: Both models support Google Assistant, but Argus 3 also supports Amazon Alexa, providing more options for smart home integration.
Reolink Argus 3 vs. E1 Zoom
The E1 Zoom, unlike the previous models, is an indoor security camera. Here’s how they compare:
- Installation: While the Argus 3 offers more flexible installation options and can be used both indoors and outdoors, the E1 Zoom is designed specifically for indoor use.
- Power Source: The Argus 3 can be powered by its rechargeable battery or a solar panel, while the E1 Zoom requires a constant power supply from a wall outlet.
- Zoom: The E1 Zoom has a distinct advantage of 3x optical zoom, something the Argus 3 doesn’t offer.
My Personal Experience
I chose the Reolink Argus 3 because it seemed to offer the best balance of features, design, and affordability. The camera has not disappointed, proving to be a valuable addition to my home security setup.
I’ve been particularly impressed with the Argus 3’s design and functionality. The spotlight and starlight color night vision are standout features that have proven their worth time and time again, offering superior performance over other models.
Troubleshooting Common Issues with Reolink Argus 3: A User’s Guide
Like any tech gadget, the Reolink Argus 3 may occasionally encounter issues. As an owner of this home security camera, I’ve experienced a few hiccups. Fortunately, with a bit of troubleshooting, I was able to solve them quickly. Let’s delve into some of the common issues and how to fix them.
1. Connectivity Issues
One of the first issues I encountered was intermittent connectivity. It’s crucial for a security camera to stay connected, so I needed a quick fix. Here’s how I tackled it:
- Check your Wi-Fi: Ensure your Wi-Fi connection is stable. I found that placing the camera closer to the router or using a Wi-Fi extender improved the connection.
- Restart the Camera: Sometimes, a simple restart can fix the issue. You can restart the camera via the Reolink app or by pressing the power button on the camera.
2. Poor Video Quality
I noticed that at times, the video quality was not up to the mark. If you experience this, try the following:
- Clean the Camera Lens: Dust or smudges on the lens can affect the video quality. A simple wipe with a microfiber cloth solved this issue for me.
- Adjust the Video Quality Settings: The Reolink app allows you to adjust video quality settings. I found that setting it to ‘1080P’ resulted in the best video quality.
3. Motion Detection Not Working Properly
Another common issue I faced was with the motion detection feature. If your camera isn’t picking up motion as expected, here’s what you can do:
- Check Sensitivity Settings: You can adjust the sensitivity of the motion detection in the Reolink app. I discovered that setting the sensitivity too low might cause the camera to miss some movements.
- Reset Motion Zones: If you’ve set custom motion zones, make sure they’re correctly positioned. I had to readjust my zones after realizing I’d accidentally left out some important areas.
4. Battery Not Charging
If your camera’s battery isn’t charging, try the following solutions:
- Check the USB Cable and Adapter: Ensure the USB cable and adapter are working correctly. I once had a faulty cable that was the culprit behind the charging issue.
- Reset the Camera: If the battery still isn’t charging, a factory reset might help. You can reset the camera using a pin or a thin needle to press the reset button on the camera.
5. Trouble Connecting to Reolink Solar Panel
If you’re using the Reolink Solar Panel and face issues, here’s what I suggest:
- Check the Cable Connection: Ensure the solar panel is correctly connected to the camera.
- Reposition the Solar Panel: The solar panel should face the sun and be free from obstructions. Repositioning my solar panel to a sunnier spot resolved my issue.
Frequently Asked Questions about the Reolink Argus 3: An Owner’s Perspective
If you’re considering investing in a Reolink Argus 3 home security camera, or if you’ve just bought one, you might have some questions. As an owner of this fantastic device, I’m here to share my experiences and provide some answers. Here are some of the most frequently asked questions about the Reolink Argus 3.
1. How easy is it to set up the Reolink Argus 3?
The setup process for the Argus 3 is pretty straightforward. The Reolink app walks you through the process, and it only took me about 15 minutes to get everything up and running. From downloading the app, scanning the QR code on the camera, to connecting it to my Wi-Fi network, everything was clear and intuitive.
2. Can the Reolink Argus 3 be used indoors and outdoors?
Yes, it can. The Argus 3 has an IP65 weatherproof rating, which means it’s designed to withstand outdoor conditions. I have mine installed outdoors, and it’s been holding up well against various weather conditions. However, it can also be used indoors if preferred.
3. What’s the video quality like?
The video quality is impressive. It captures footage in 1080p resolution, providing clear, sharp images. I particularly appreciate the starlight color night vision, which gives me clear color videos even at night – a feature not commonly found in other models.
4. How does the solar panel work with the camera?
The Reolink Solar Panel is an optional accessory that can provide a continuous power supply to the camera. I’ve connected my Argus 3 to the solar panel, and it keeps the battery topped up, meaning I don’t need to manually recharge it. It works even on cloudy days, although it’s more efficient with direct sunlight.
5. What happens when the camera detects motion?
When the Argus 3 detects motion, it sends an alert to your connected device via the Reolink app. I find this feature incredibly useful as it allows me to monitor my property in real-time, no matter where I am. The built-in siren and custom voice alerts are handy additions that can be activated to deter any unwelcome visitors.
6. How is the data stored?
The Argus 3 supports both local and cloud storage. For local storage, it has a microSD card slot (card not included). As for cloud storage, Reolink offers subscription-based cloud storage plans. I use both options for extra data security.
7. Can I share access to the camera with others?
Yes, you can. The Reolink app allows you to share the camera access with your family members or friends. I’ve shared access with my spouse, and it’s been a smooth experience.